Instructions for photo editing with photoshop online or adobe photopea help turn an ordinary photo into a beautiful, intoxicatingly beautiful photo when photo editing with photoshop changes color and stitching the image onto another image.
In adobe photoshop software and now online photoshop from photopea, the work most used by users is cropping the image, merging the image into another image, editing the color of the image , … By applying tools in photoshop to do that.
At present, there are many new computer software such as adobe lightroom to change color alignment for photo editing. Or on Smartphone, there is famous software from google, Google Snapspeed. They are great and have many advantages over adobe photoshop PC such as handy and fast.
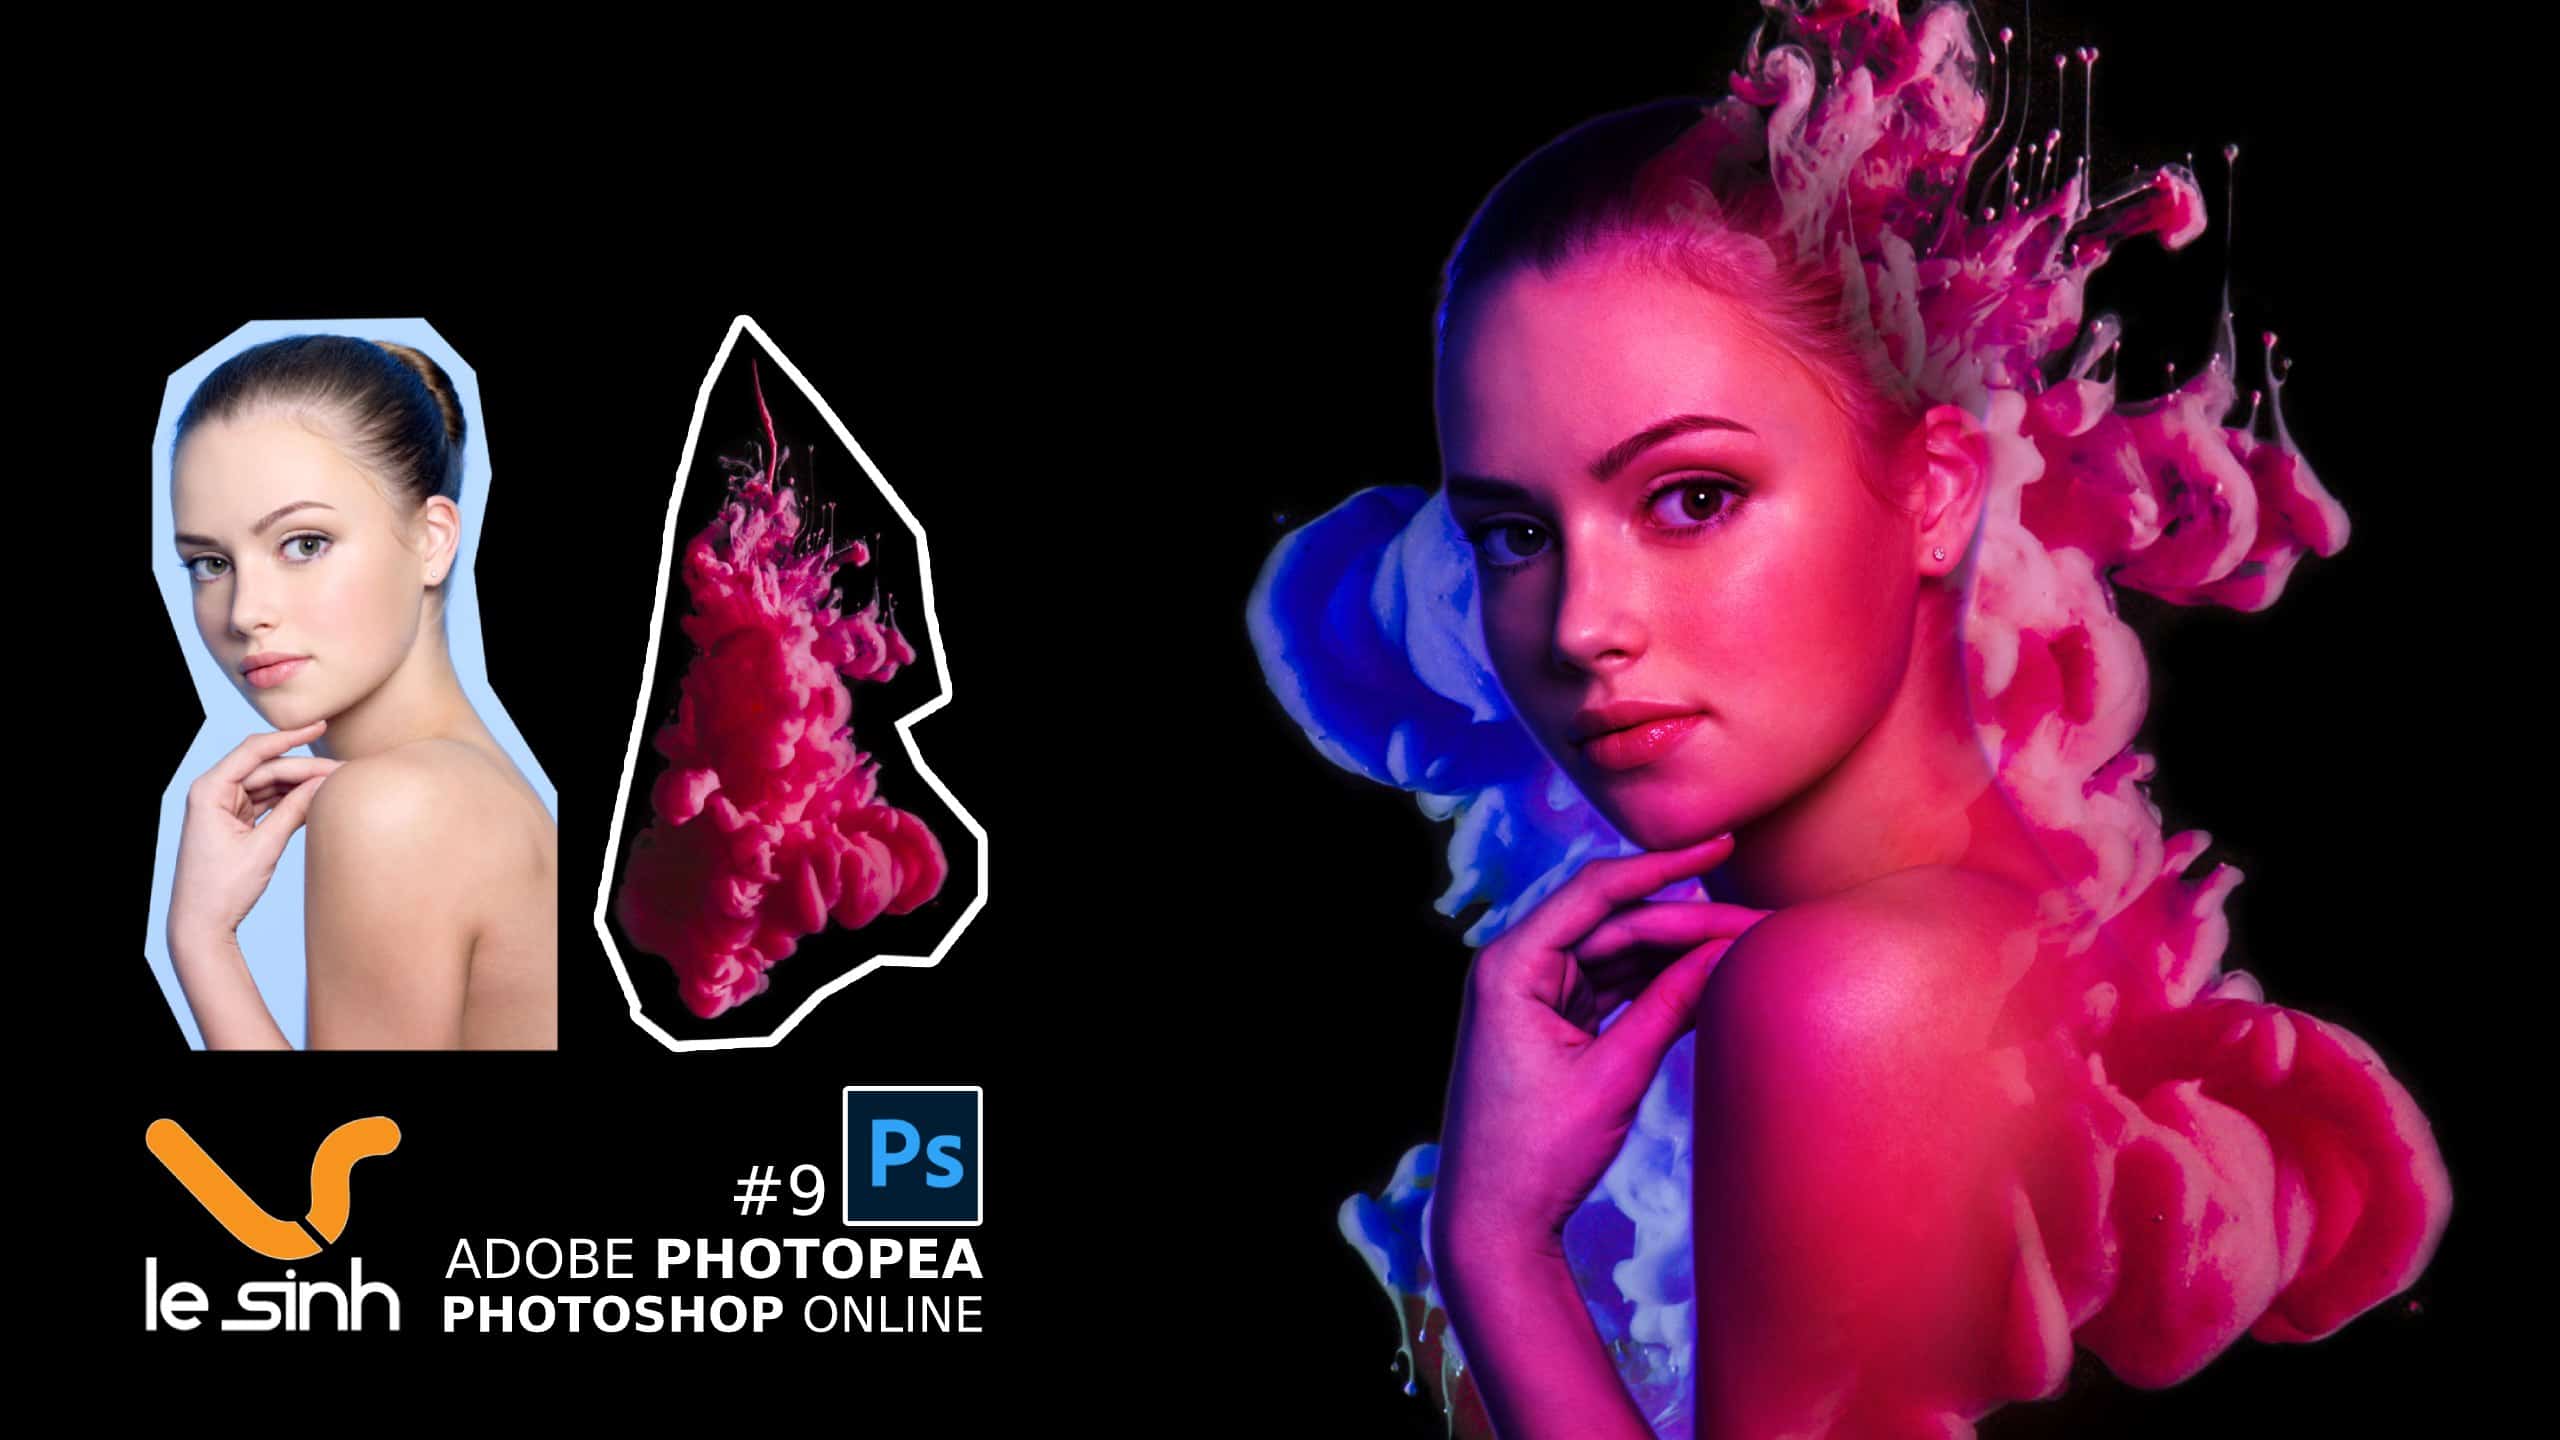
Why photo editing with photoshop online
As mentioned above, nowadays with rapidly growing algorithms and many good programmers. There are many software that gradually replace photoshop PC and online photoshop. These softwares gradually have full of features that traditional Photoshop software “dominated” for many years.
But with Photoshop software, especially adobe photoshop used for the computer version and now there is an online photopea editor that does not need to be installed. Then the convenience of having Photoshop software is still the best with all the customization you need and can do anything with this software. The only thing that limits is your creative mindset and ability to use it.
Full range of professional photo editing tools
The full range of professional photo editing tools is the first thing that users, especially designers, use online photoshop and adobe’s Photoshop installation. With the conclusions and the pioneering of many years, adobe software has summarized and integrated almost all the features of photo editing with photoshop perfectly.
With the application of many different methods of each tool in Photoshop, you can completely remove acne with photoshop , remove wrinkles, collage different images to form a professional image product for use. printing or marketing the company’s products.
Using … a computer mouse
To photo editing with photoshop online or edit photos with any software. Then the big difference can come from the computer mouse! You can use the photo editing software androi or ios very easily, just go to the download store and also use your fingers to use the tools of those software.
But I firmly believe! It is very difficult to use 100% of the capabilities of the tool in photo editing apps from smartphones. The reason is the small operation screen (even tablets), which … your fingers are pretty big. In the process of using many times can make you difficult to manipulate in small spaces on the image.
Computer mouse is completely different, it gives you access to almost every corner when editing images (on a phone or tablet, using a stylus is probably as good as a computer mouse on a PC). Accordingly are your fingers used with the mouse. Helps speed up manipulation faster thanks to 2 hands.
Instructions for photo editing with photoshop online
Saying a lot of information just now on the sidelines, now I would like to go straight to photo editing with photoshop tutorials. Please note that this article I guide on the platform of the Photopea editor. This online photo editing software is almost similar to adobe photoshop. So you can fully apply it to photoshop PC.
Raw materials for photo editing
To make this tutorial easier for you I have attached the image file to this exercise. Includes 2 pictures of a girl and an image of color smoke with medium resolution (downloaded from Freepik ). The reason for using medium resolution (photos below 5MB) is if you are using too high quality images on a low-end computer.
If the image is too high (large capacity), you will experience lag during use if your computer has a low profile. Use large images when making sure your computer has a better configuration! But first, of course, visit photoshop online ^^

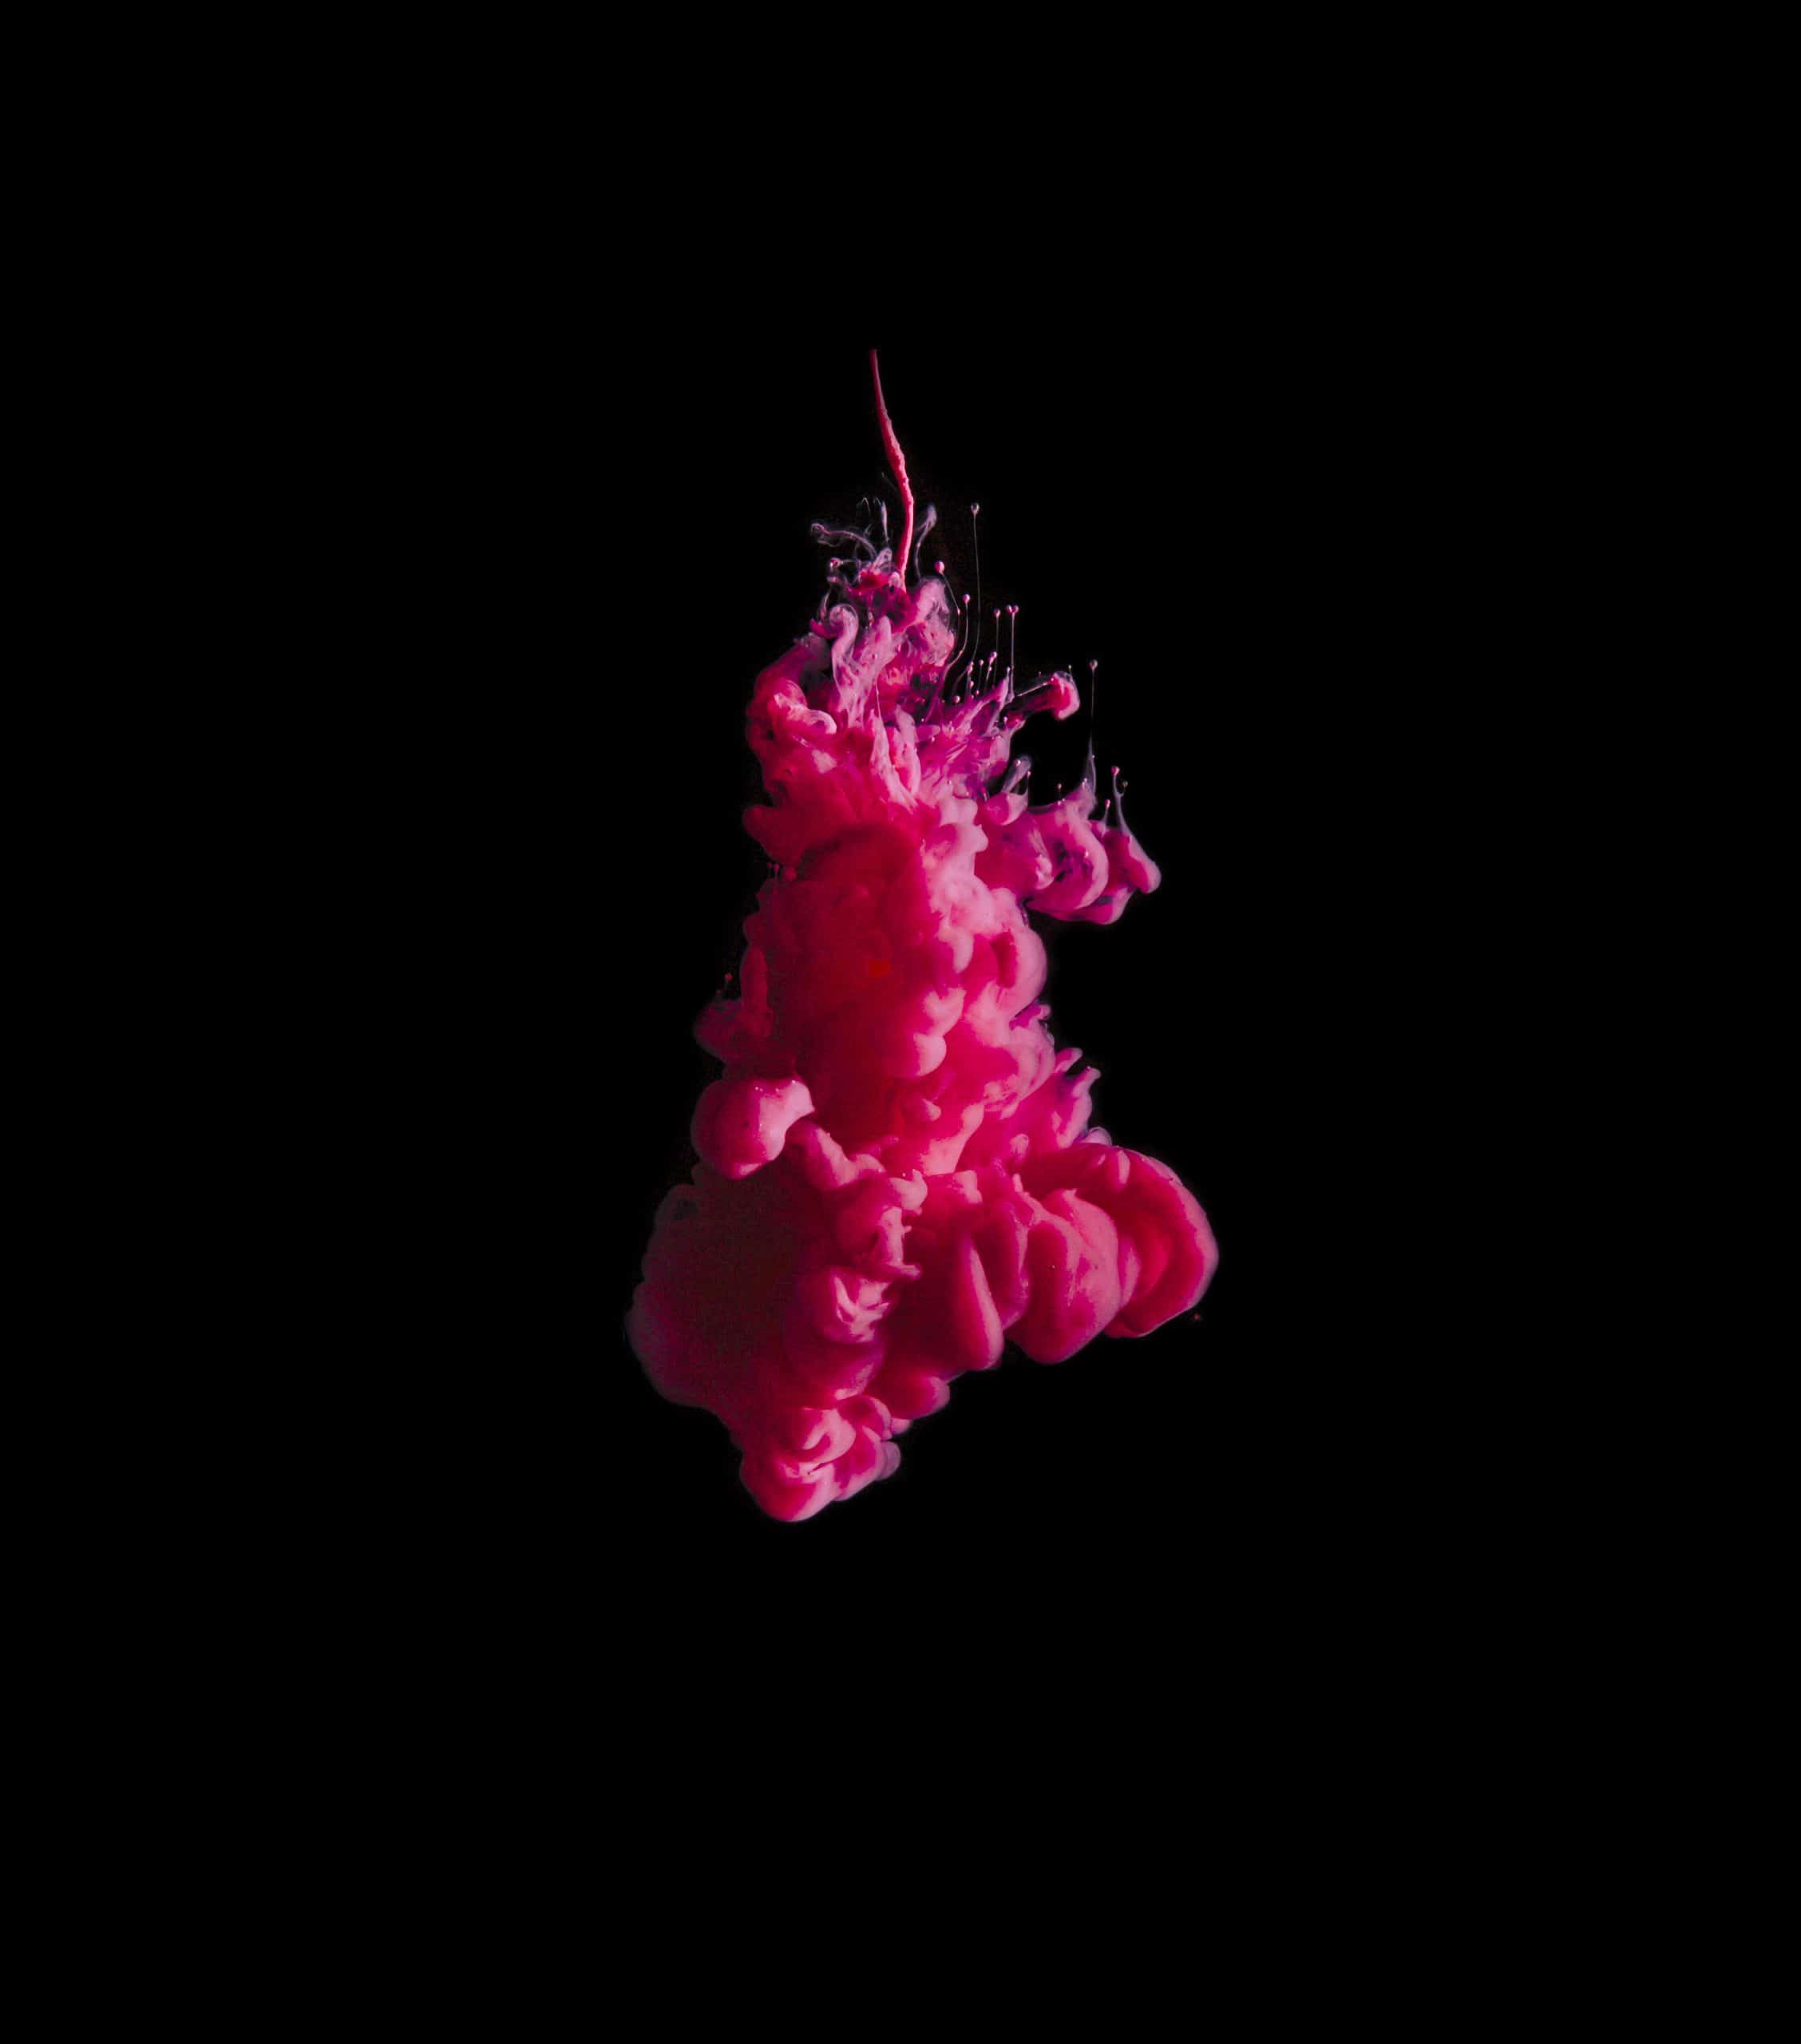
If downloading images to your computer does not show up (error), open the image on a new browser tab. Then delete .webp after the link and Enter. Next, save the image to your computer.
Start working with the software
To ensure convenience during photo editing with photoshop, work on online photoshop and if your computer has a resolution below FullHD (HD only). Use Ctrl + minus key (the symbol -) to minimize the browser to 90%. I do not have a computer with FullHD resolution so I have to apply this way. In general, this is just a marginal measure ^^.
Then, you must press F11 for the browser to appear in “full screen” mode. Make sure you do this. Yes so, during use will not encounter errors. For example, otherwise F11 leaves the browser full screen. When using the keyboard shortcut in Photoshop , Ctrl + T, will coincide with Chrome’s Ctrl + T command (open a new tab).
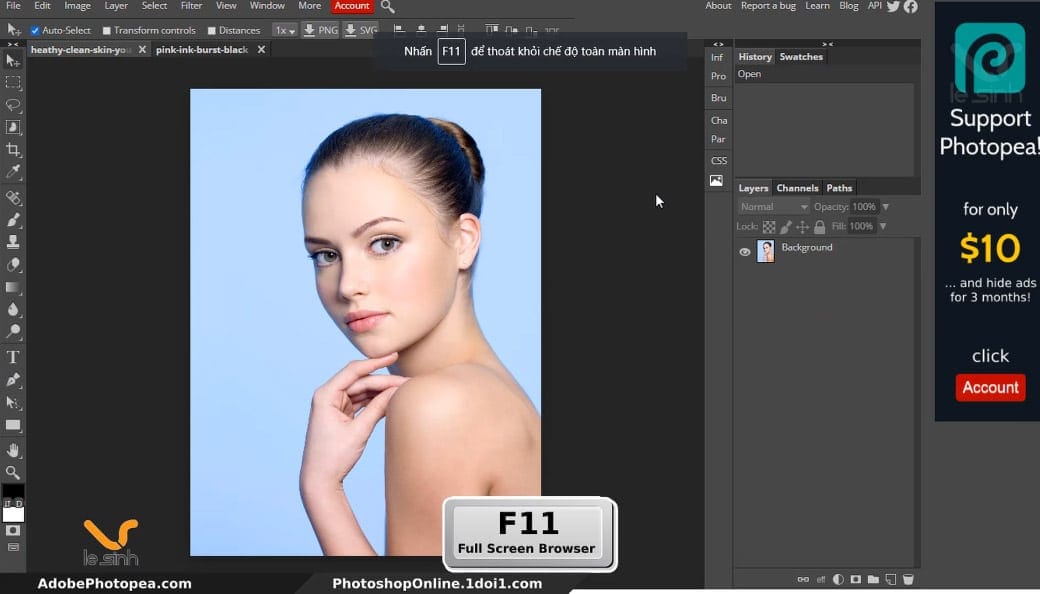
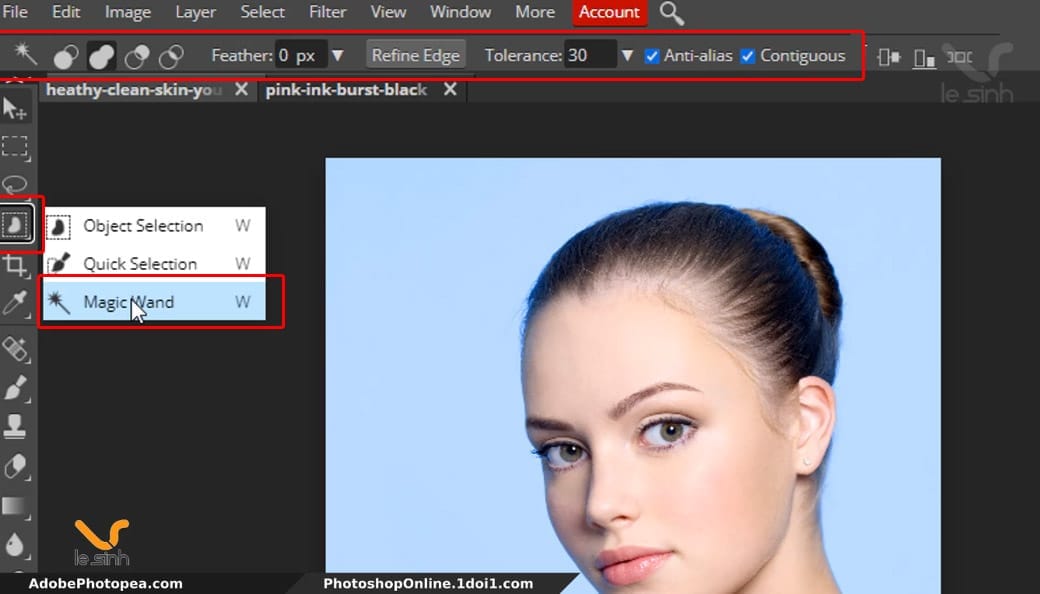
Use the Magic Wand tool to separate the background image
Step 1 : Use the Magic Wand tool and select the parameters as in the attached image below. In this case I used the magic wand because this model image is quite easy to separate because the background and subject have a distinct color, and not being affected by other subjects, using the magic wand is the fastest.
In Photoshop there are many tools to separate a subject from the background. Like Pen Tool (shortcut is P) or Lasso Tool or Quick slection tool, … Especially if you use the computer version of photoshop from adobe vendor. There is a new tool, Select> Subject, which is an AI rapid image extraction tool in Photoshop.
Use the left mouse button, click on the light blue partition (background color) on the female model image. Be sure to choose internal locations such as the gap between the fingers and the space just below the female model’s neck.
Invert the selection using Photoshop commands
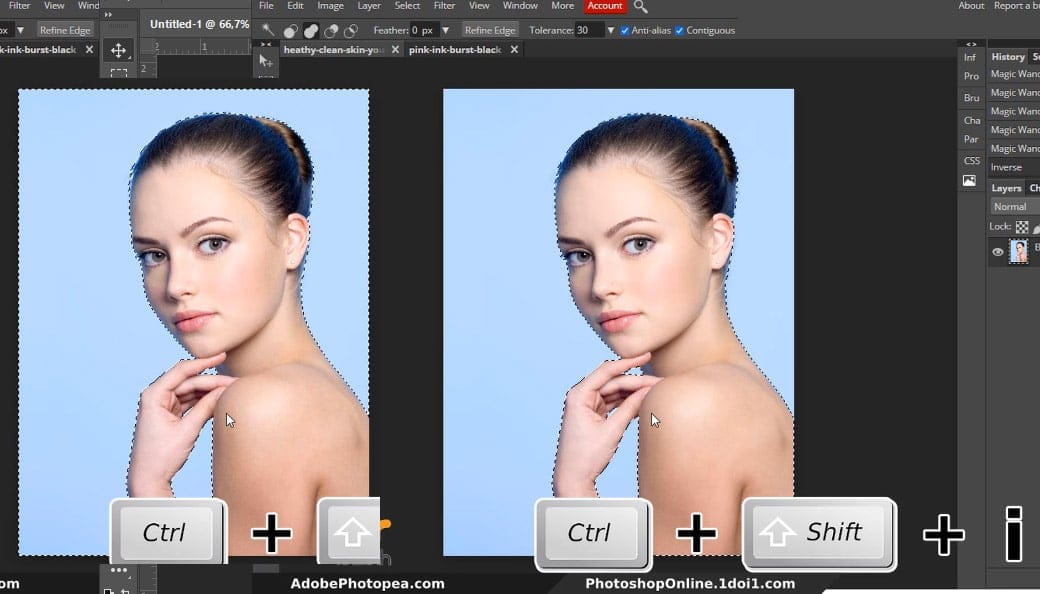
Step 2 : Invert the selection from the background image to the girl with the command Ctrl + Shift + i . When using the Magic Wand command above to select objects. You just selected the background of the photo, not the girl yet! Our goal is to separate the background for the girl right ^^. For waving, invert the selection: from “background image” to “girl”.
At this time the software is zoning to select the girl. But separating the background with the Magic Wand tool has a problem. It is that the edges of the image (where the girl meets the background) will not be smooth, instead the thorny, prickly. If so, the image will be ugly at the intersection. Go to step 3.
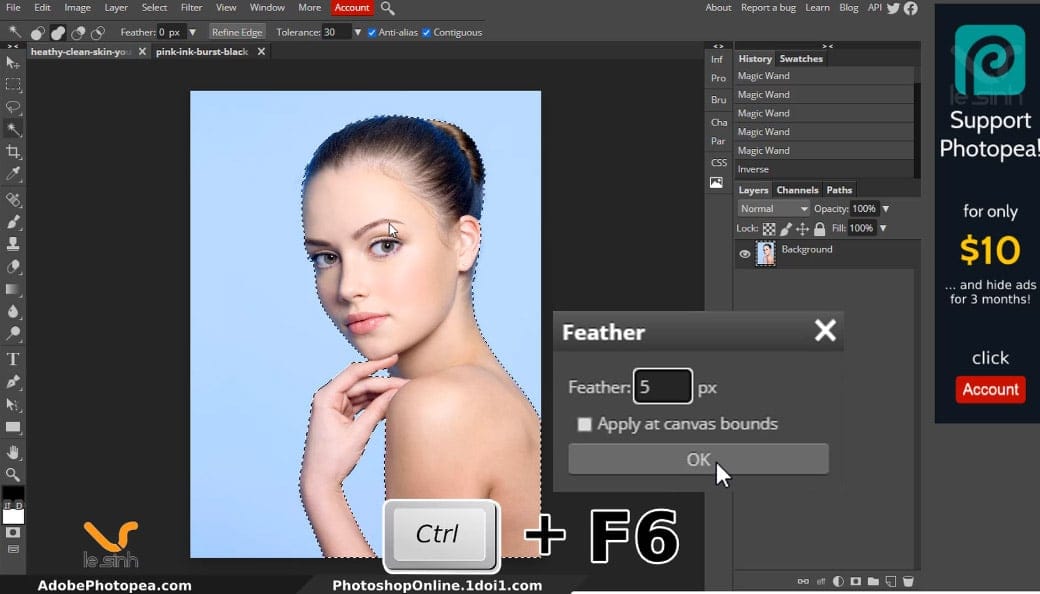
Step 3 : Continue to smooth the selected partition around the model by the Feather command with the keyboard shortcut in photoshop as Ctrl + F6. And the parameter I choose will be 5 (in my experience). You choose a different parameter if it makes you feel better than yours.
Briefly about Feather in photoshop: it means, instead of the selection is cut right at the line (dashed lines) with 100% cut. When increasing the Feather parameter, the cut area will be smoother and overflow. The cropping area will partially blend into the old background image as if blurred.
Masks the selected image area
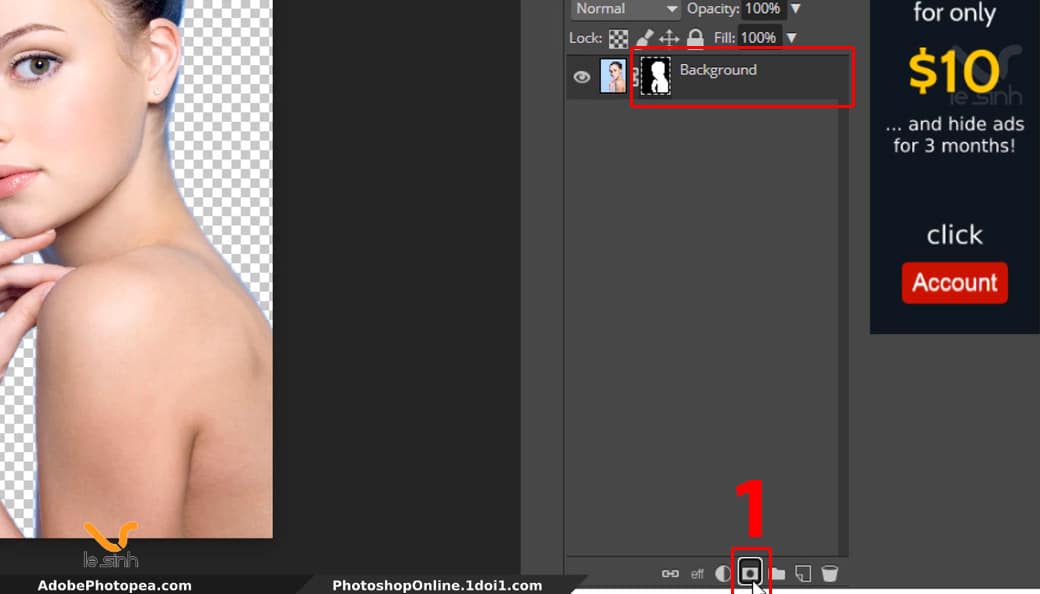
Step 4 : Once you have a female model selected. Let’s mask that selection. Look at the bottom – right side of the tool (layer container). Select a tool with the rectangle and circle in the middle. That is the Add Raster Mask tool , the created mask will erase all the background images. just keep the girl with transparent background.
During this photo editing with photoshop exercise. We will need to reuse the selection of the area many times, so separating the background and masking the main subject is essential.
Resize the picture
Step 5 : Very quickly we have come to step 5 to edit photos with photoshop online. Press Ctrl + T to select the current layer containing the model girl. The Ctrl + T command makes square dots appear around the selected layer (usually 8 transparent squares in the corners and between the horizontal – vertical lines).
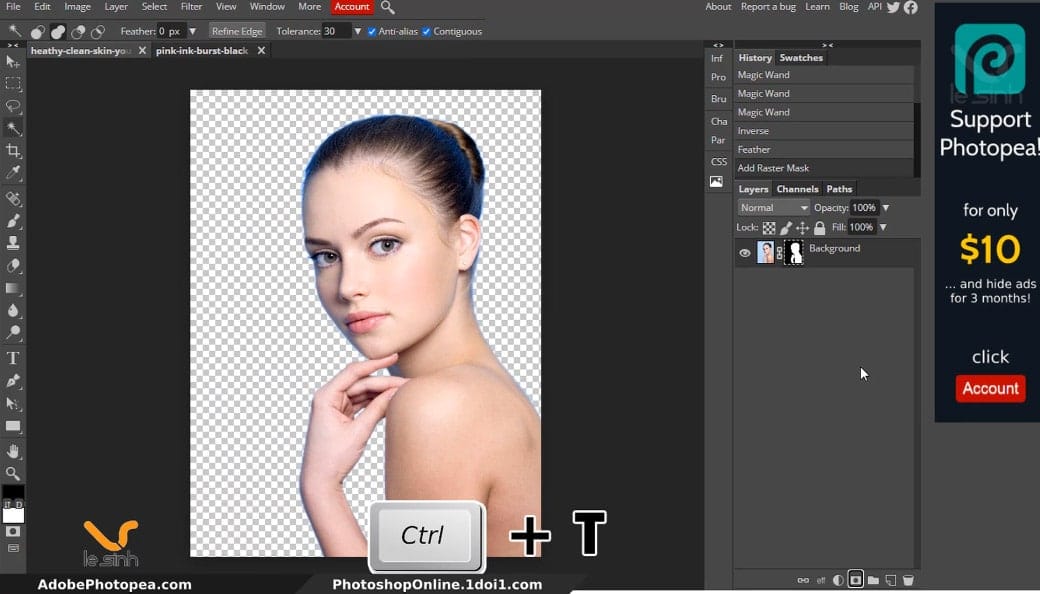
Understand the basics, after using the command Ctrl + T in photoshop. You will use the left mouse button. Click on any square and drag the square to move as desired. From there, you can resize the image or deform the image at a certain angle according to your working needs.
Step 6 : But in today’s photo editing with photoshop document, I will shrink the photo of this girl. And do not want the image to be distorted at any angle (keep the aspect ratio the same). So before left click on a square to drag. Do more with Shift + left mouse.
The big difference comes from here and you can always try to get a better understanding. By removing the Shift! Then just use the left mouse button and hold down on a square on the selected image. Next, moving the mouse, the image will be deformed. If you want the photo back as it was. Please Enter and Ctrl + Z.
Back to this online Photoshop photo editing tutorial. After Ctrl + Z to return the photo to the original size (like before doing Step 5). Press Ctrl + T> Next left click on the top – right corner. Hold the mouse pointer and press the Shift key . Then, drag the mouse to move in the center to zoom out the image in the direction of focus.
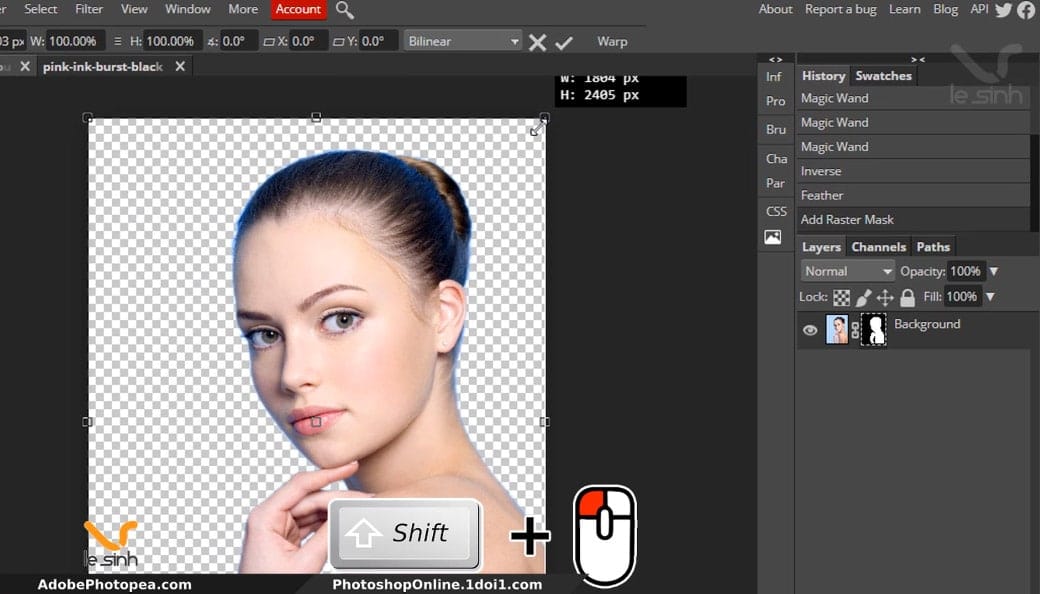
Once the main character image is in the desired position, finish CTRL + T with the Enter key on your keyboard. The border around the main character will disappear.
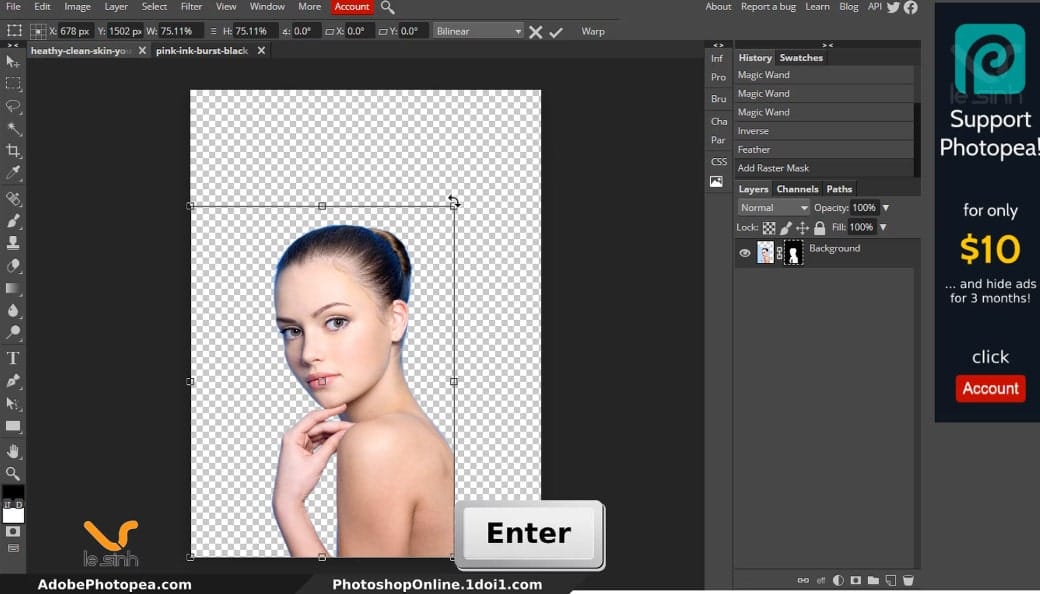
Cut out need to join into photo editing with photoshop online
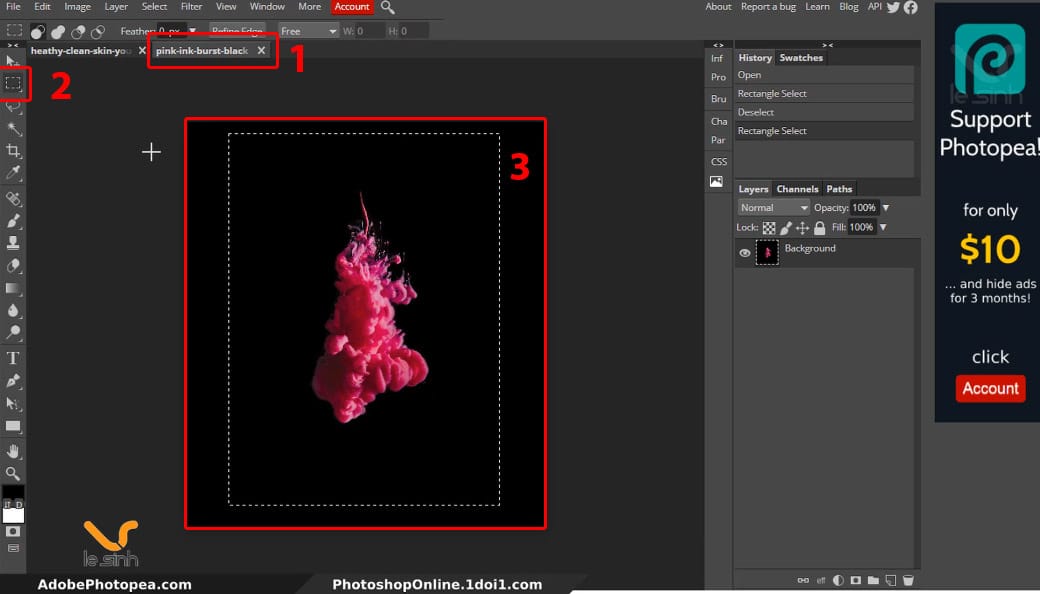
Step 7 : Access through the tab containing the picture named pink-ink-burst-black like I have attached at the beginning of the article. If you haven’t opened the file pink-ink-burst-black. Open it up and copy it to the layer containing the girl.
Use the Rectangle select tool (M). Left-click a point on the image, hold the left mouse button and drag it to cover the image to create a partition of the image to be selected. You can see I chose the pink smoke. Once selected is the pink smoke. Use the CTRL + C command to copy the selected area.
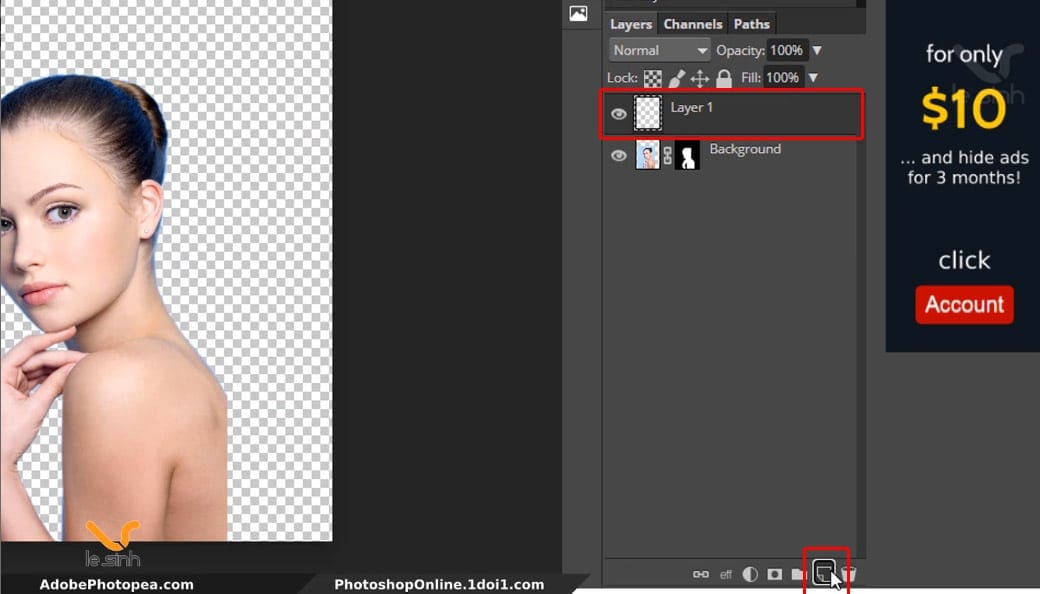
Step 8 : Go back and select the female model’s file. Move the mouse pointer down below the toolbar of the layers panel. Click on the New Layer icon (shortcut Ctrl + Shift + N). Next, paste the copied object (pink smoke) into the new layer.
Creating this new layer is essential, because if you don’t create a new layer, when you do Ctrl + V (paste the copied object) the image will be inserted into the girl’s layer mark.
Left-click on the pink smoke layer, drag the layer below the model girl’s layer. Girl above, background layer below. Then if you find that the layer size with pink smoke is too small for the girl. Do the command Ctrl + T to enlarge the background layer. The same action as Step 6 .
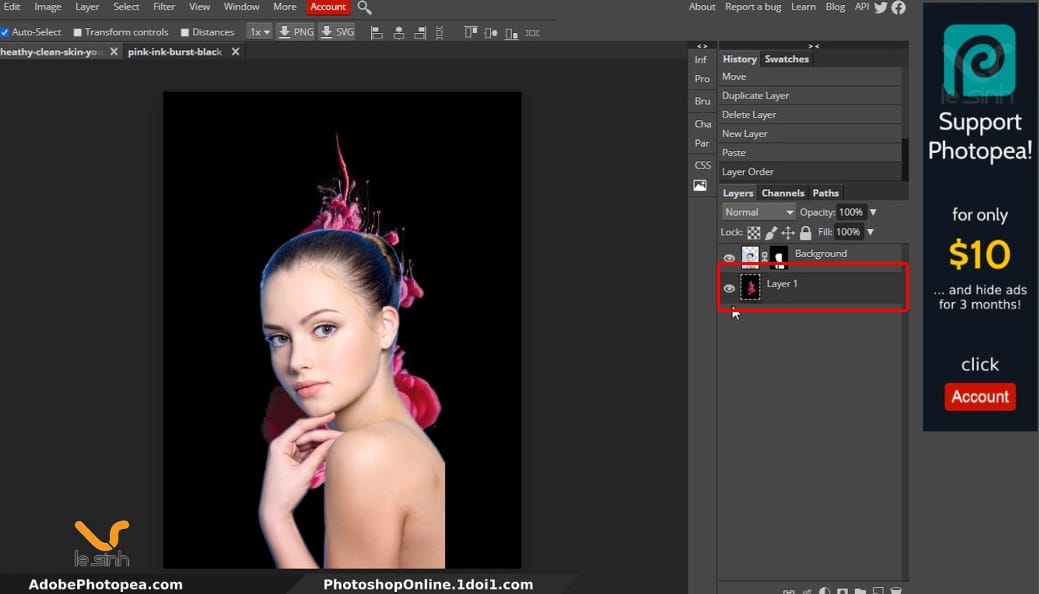
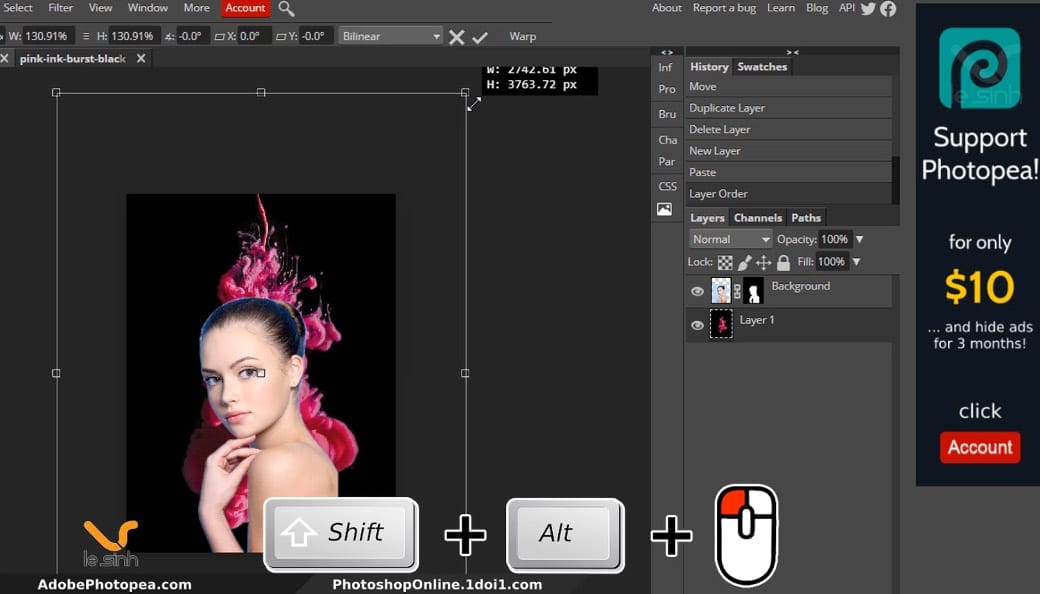
I would like to introduce one more command. That is instead after Ctrl + T. then left click and hold Shift to drag the picture by an angle. You execute the command Shift + Atl + left click and drag the image outward or centered. This command helps the image to be enlarged and reduced in accordance with the current center position. Enter ends the command
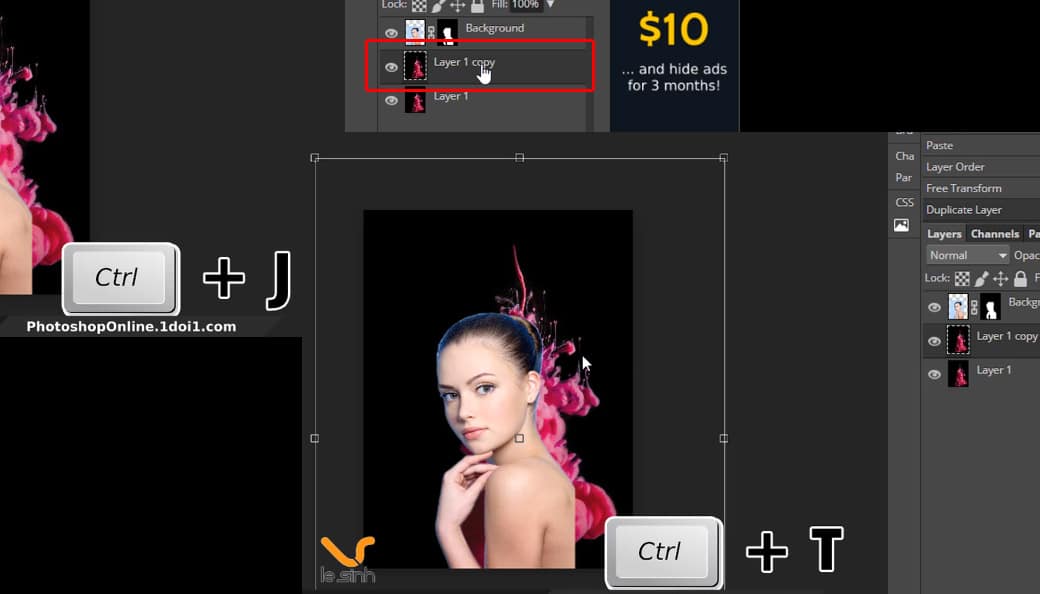
Step 9 : Select the background layer (pink). Use the duplicate object command Ctrl + J to make a copy from the background layer containing the pink smoke. Next, use Ctrl + T command to select the “duplicated layer”.
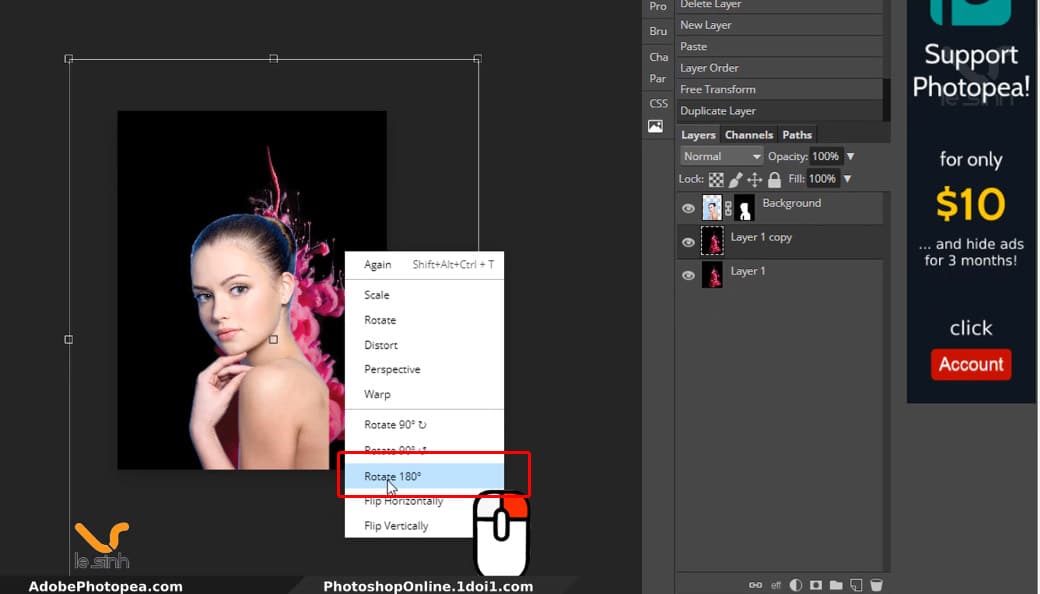
Right-click on the layer> choose Rotate 180 to rotate the image 180 degrees for the purpose of inverting the object. Move position to suit your needs and taste. End the command with the Enter key.
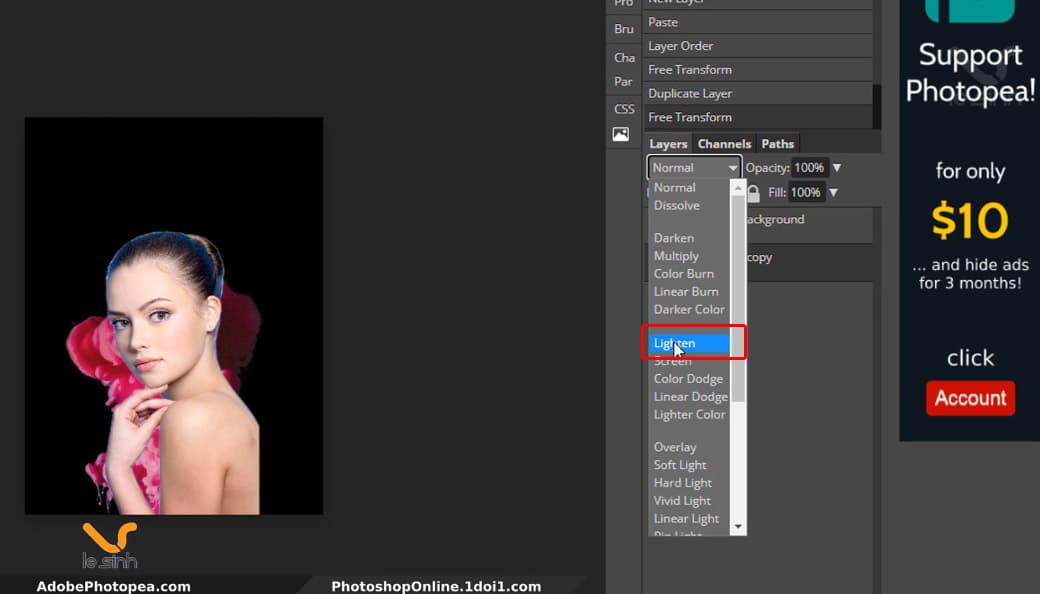
But for now, the duplicated background layer is covering the original background layer. Access the menu in the area containing the layer. Select the blending mode of Lighten to blend the 2 layers together in color. Helps to see the original background layer
Change image colors
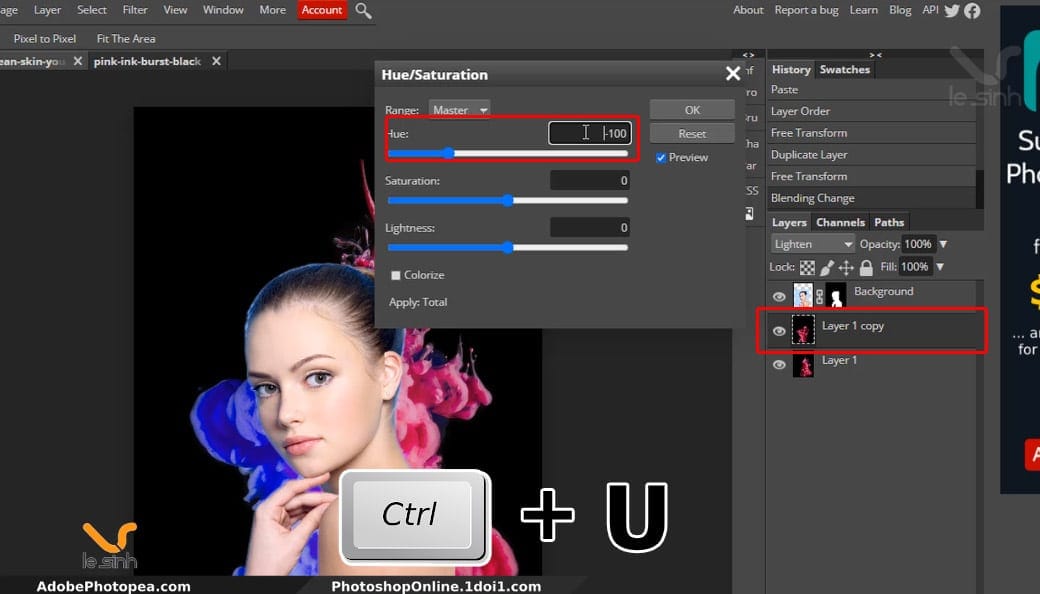
Step 10 : Change the color of the duplicated background layer. I want to turn the copied smoke to blue. To do that, I’m still selecting the duplicated background layer. Press the keyboard shortcut Ctrl + U to open the parameters panel. And the Hue parameter is -100.
The reason for using the -100 is because I want the smoke cloud color to look similar to the blue background of the girl’s hair that existed before. Like that, it seems appropriate to change the color of the smoke cloud to blue temporarily.
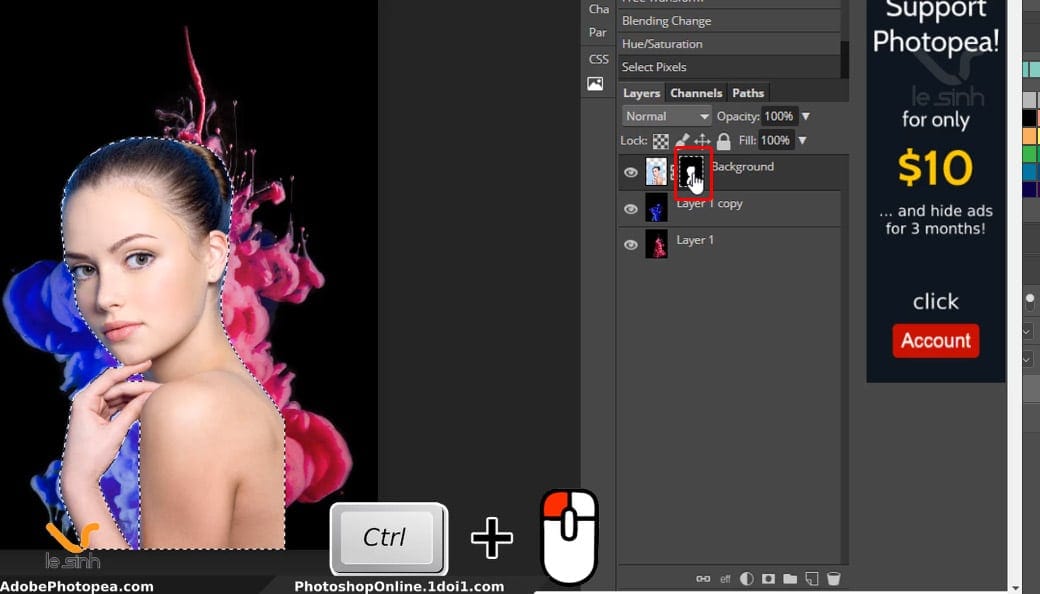
Step 11 : Next is adjusting the light for the girl. But first to avoid changing the brightness of other layers. I just want to select the girl, by holding Ctrl + left mouse button on the Mask part of the girl layer
In the image below is the layer named Background, sorry for the inconvenience, Next time I will put on the layer for you to understand. So the selection appears and surrounds the girl, inviting you to the next step.
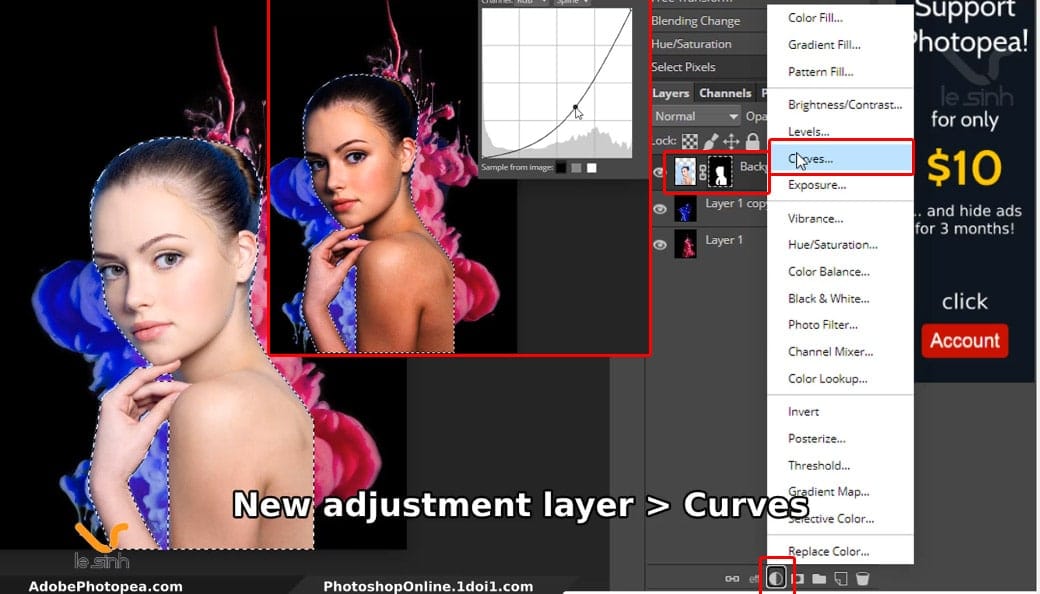
Step 12 : Take a look at the image below to reduce the light parameters with curves in photoshop. Select and follow the path of New Adjustment Layers> Curves tool to reduce the brightness of the selected layer. Click the left mouse button on the Histogram Graph line and drag it downwards as shown.
The Histogram graph allows you to drag the light and dark contrast of the light by selecting a point on the graph and dragging into the bright or dark areas to change the light and light intensity entering the image. I reduced the Histogram Graph so that the girl’s light was a bit darker.
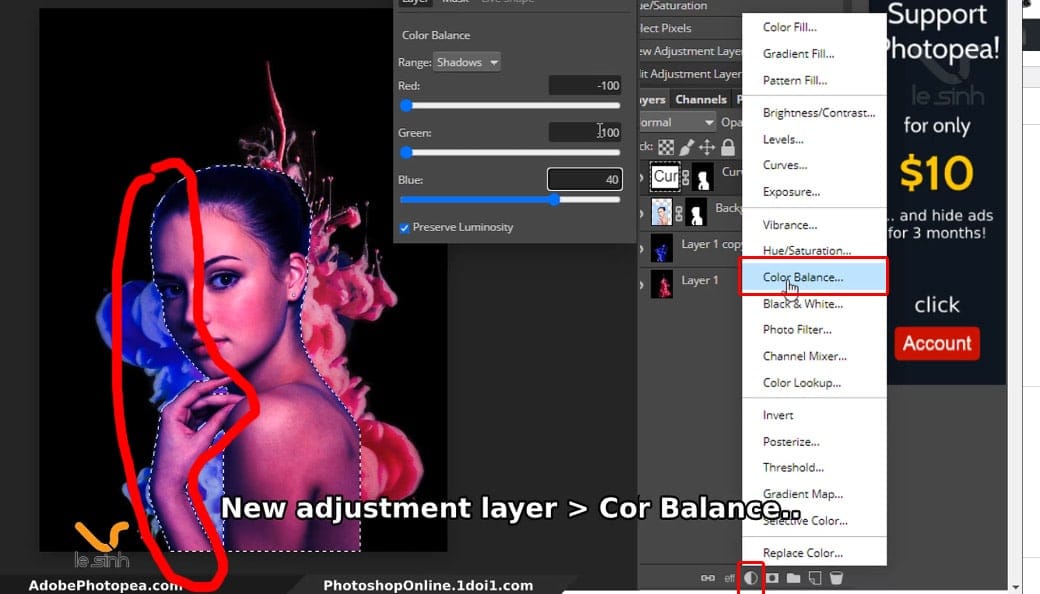
Step 13 : Next, still in the girl’s selection, change the color by Color Balance in online photoshop using the path New Adjustment Layers> Color Balance to overlay the girl. First one third of the girl is from left to right.
Parameter Red: -100, Green: -100, Blue: 40 so the color overlay turns blue like the blue background we finished in the color change step above.
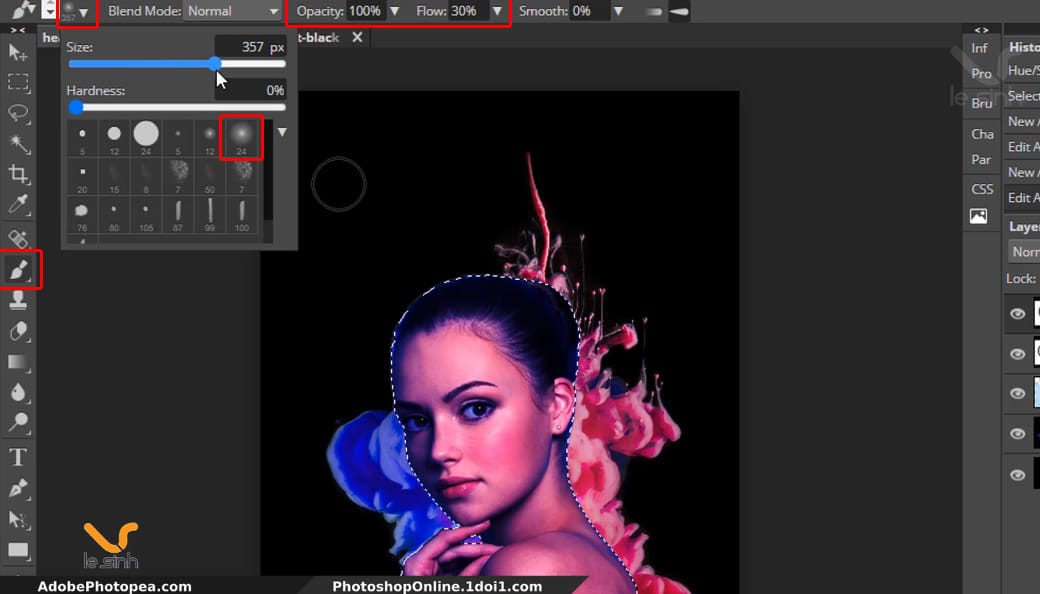
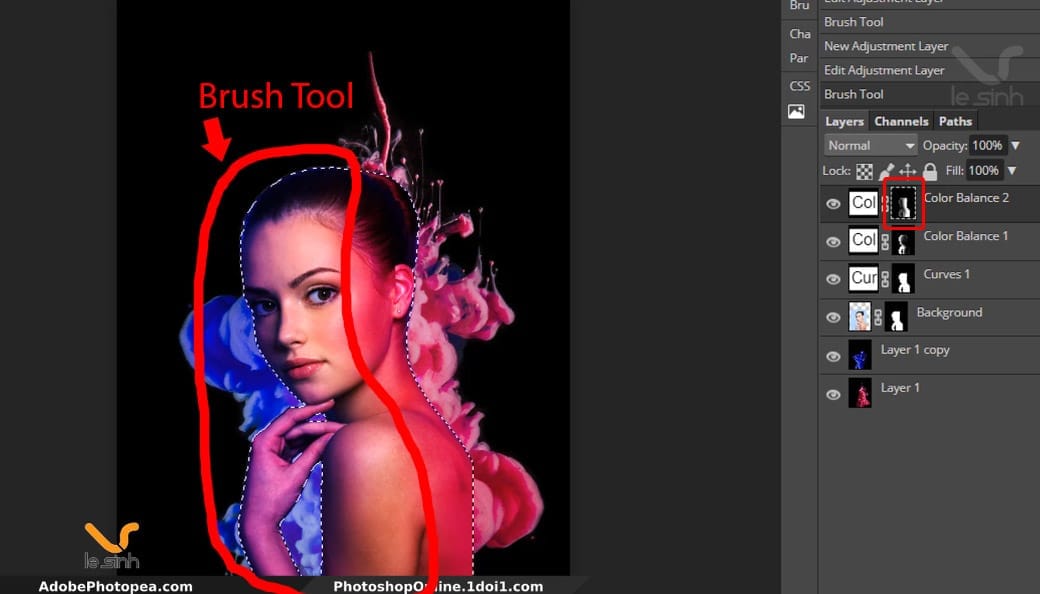
Step 14 : Use the Brush Tool (B) and select the parameters like my image. Now let’s erase the Color Balance overlay because I just want the blue color to cover 1/3 of the girl, not the whole girl.
Once you have selected the parameters shown in the image, you left click on the image area of the girl, and delete the color balance overlay you want.
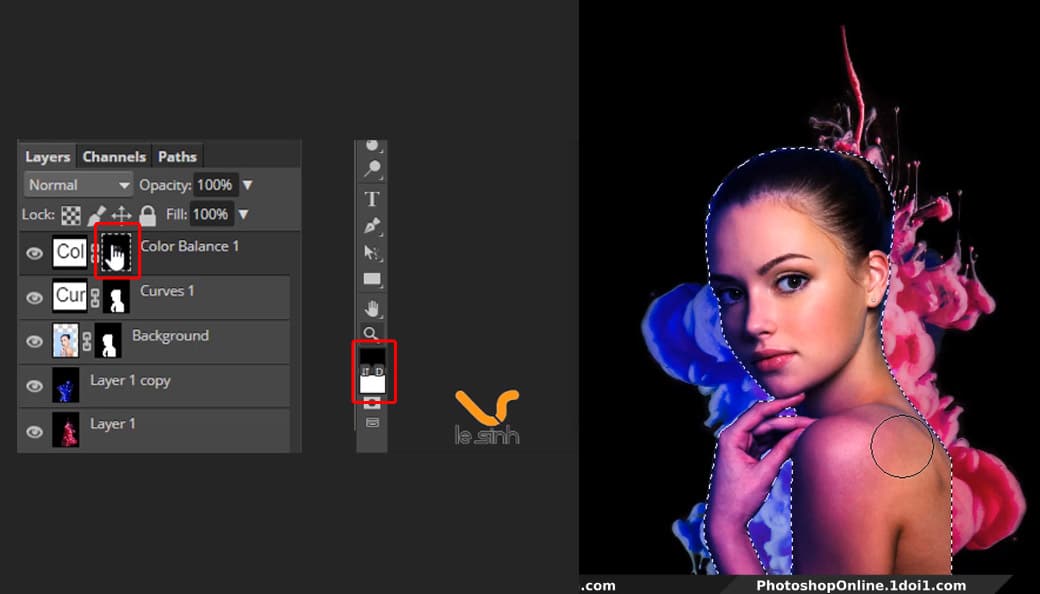
Note: before using the Brush Tool to erase the color overlay created from Color Balance. Make sure you are selecting the Layer Mask of the Color Balance layer (as shown below) and the tool’s color mode (as shown below) is Black above. Looking at the image below, I have erased Balance’s blue overlay.
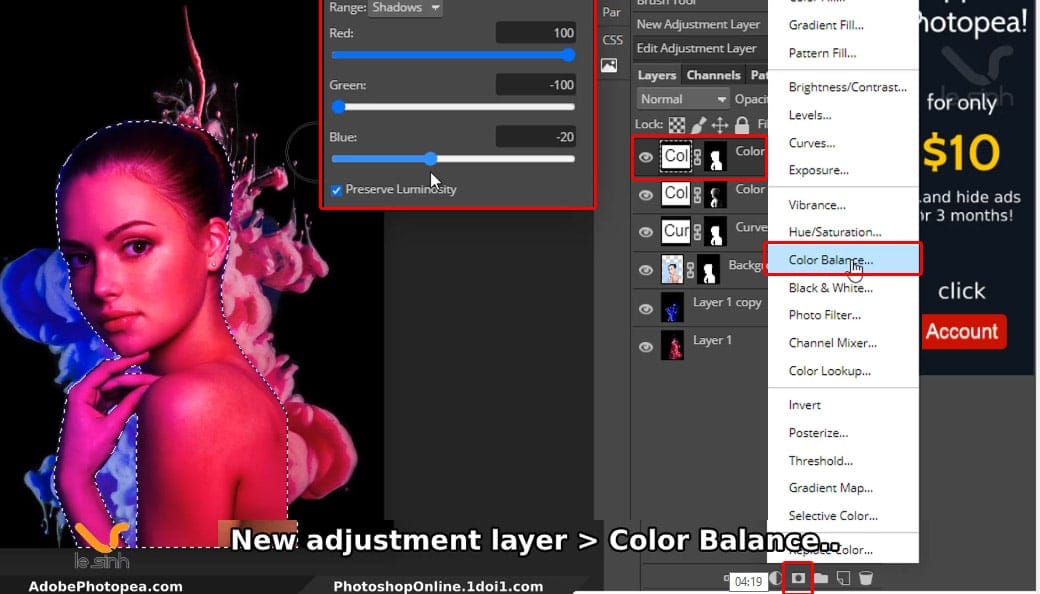
Step 15 : Repeat steps of Step 13 and Step 14. Create a new Color Balance layer from the selection of the female model. This time, I’m going to change the girl’s color 1/3 from right to left. Go to New Adjustment Layers> Color Balance. Red: 100, Green: -100, Blue: -20.
Temporarily call this color balance layer “Color Balance covered in pink”. Explanation of this parameter: you can choose another parameter, I want the color to look like the background color of the pink smoke, so choose the same parameter.
Step 16 : Continue to select the Brush Tool (B) like step 14 (remember to select the Mask of the newly created Color Balance layer – Color Balance is covered with pink). Use the Brush Tool to erase 2/3 of the layer “Color Balance covered with pink” (from left to right). Keep only 1/3 of the color coating (from right to left).
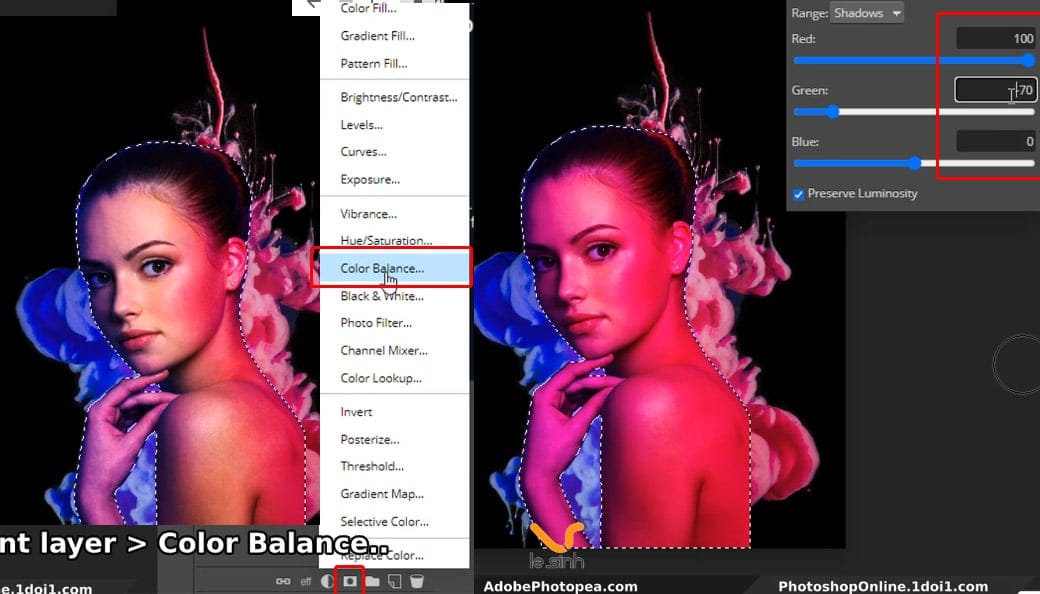
Step 17 : Perform the 3rd Color Balance operation. With the parameters Red: 100, Green: -70, Blue: 0. This time to create a color overlay in the center of the model. Once you have created this 3rd color overlay. Continue using the Brush Tool to erase the left and right sides. Keep only the middle color.
Complete 3 color overlays. Use the command Ctrl + D to turn off the selection.
Processing the background of the image
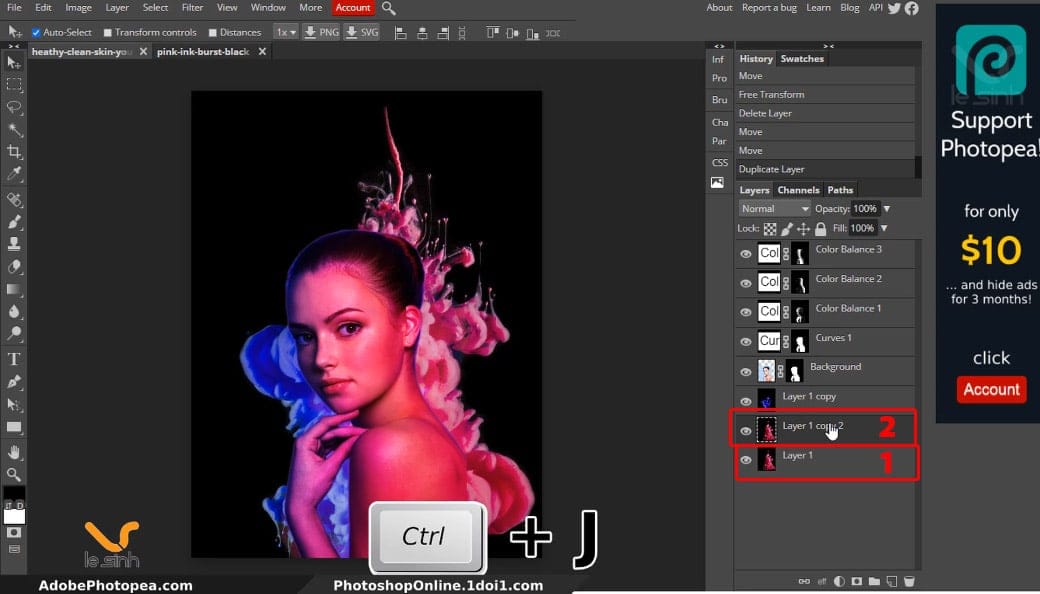
Step 18 : Coming to the final steps of the online Photoshop photo editing lesson! Select the background layer (1 – as shown), use the command duplicate layer CTRL + J to create a duplicate background layer (2 – as shown). Then, select and hold the duplicated background layer (2). Move – drag upwards so that it makes the top layer stand in the layer copy.
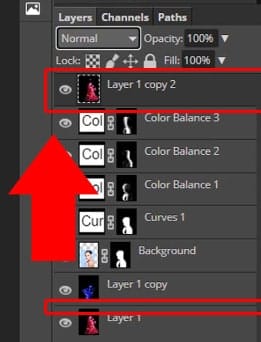
Step 19 : Select the background layer you cloned. Use the Eraser tool (E) to erase a part of the duplicated background layer. The parameters of the Eraser tool you can refer to are the same as mine. Can change depending on your removal needs.
The reason we’re doing this, is to partially erase the copy background layer. From there, help show the layers below.
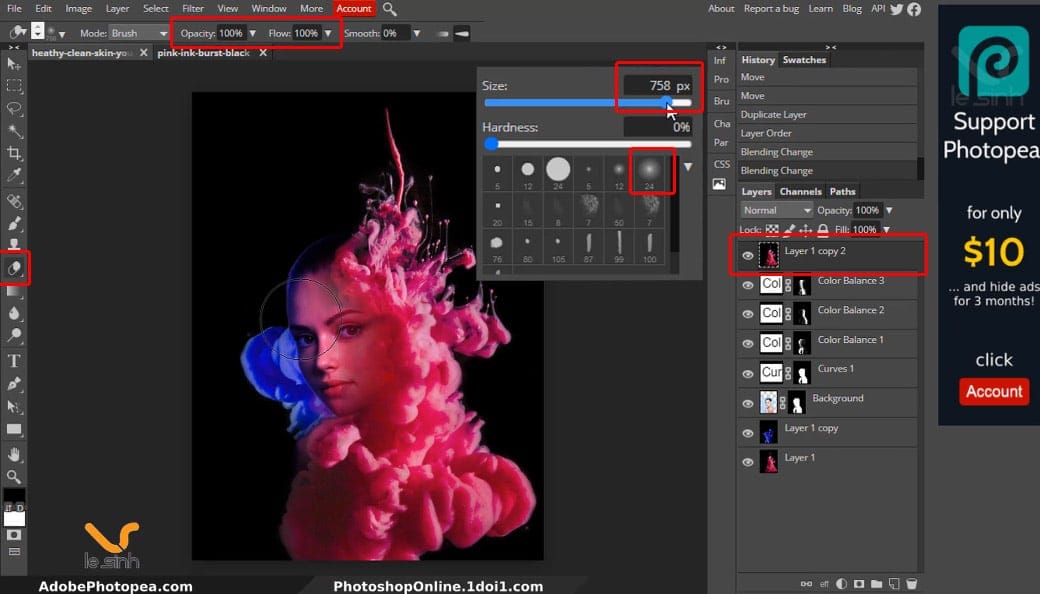
Step 20 : Congratulate you and hope the presentation of the tutorial is easy to understand and error free. Because if so, you have completed 100% of photo editing with photoshop tutorials Photopea editor. Look at the results through all 20 steps. Good luck.

Video editing with photoshop software
Like other exercises, from Youtube channel Le Sinh, there will always be articles on Photoshop online and Adobe photopea blogs with detailed presentations to share knowledge and detailed procedures for performing Photoshop operations. Accompanying it is a video inviting you to watch, I believe watching video helps you capture my actions faster.
Thank you to everyone who visited Le Sinh’s website and Youtube channel. If what I present helps you. Please click on the ad on the website or subscribe to my youtube channel.
The total time for me to do all editing of articles and video recording is 2 consecutive working days, so I am really grateful when you click on the ad to support me. Thank you so much for your readers
This article was written by Le Sinh from AdobePhotopea.com and Photoshoponline1.doi1.com. Please do not copy the article in any way to respect copyright.