Instructions to Create Silk in Photoshop online easily Create Silk in Photoshop photopea and similar on adobe photoshop PC, still very easy to use. You will quickly have a silk strip from a small fabric that adds softness to the image you want to describe.
The use of silk in advertising design is many because it enhances the soft charm in product descriptions or creates sophistication – elegance in the image you want to convey to the audience. And of course the purpose is to attract the attention of the viewer.
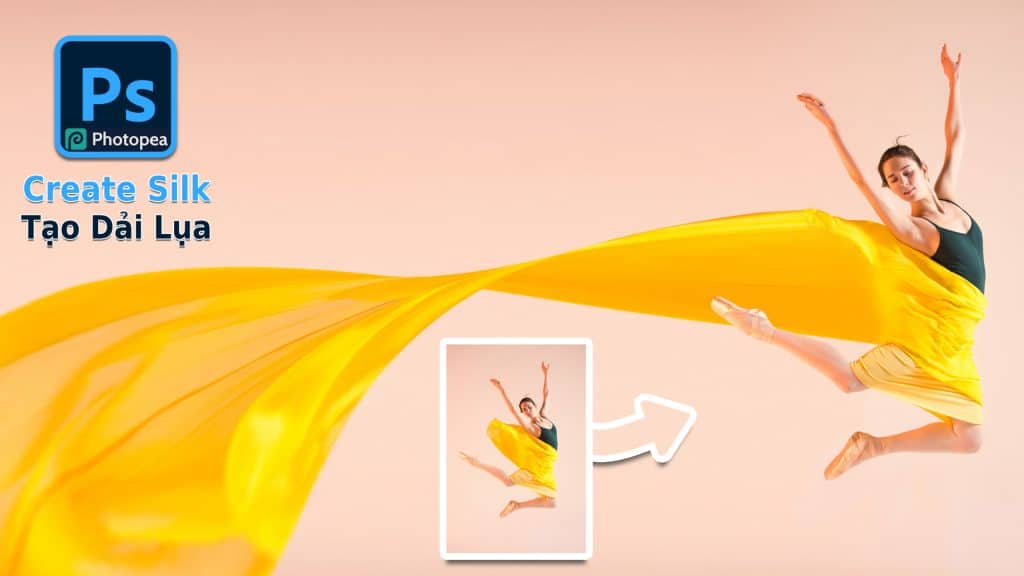
Application of Create Silk in Photoshop
As mentioned quickly at the beginning, creating ribbons in photoshop or other software such as ilustrator, corel, … are used by designers a lot and for a long time. It is most commonly encountered in products specifically for women such as: designing leaflets advertising perfumes, cosmetics, designing posters for technology devices, …
Or the banners introduce the media events of the beauties such as beauty programs, beauty pageants, etc. With a soft silk strip, it will contribute to the softness and charm of the product for the desire to convey. information to customers faster and closer.
Tutorial to Create Silk in Photoshop
Starting work on Create Silk in Photoshop today, as always I would like to provide the image file used in this free photoshop tutorial. The file is attached below, please remove the .webp extension in the image link if you can’t save it on your computer
Resources
I named the file “Pic 1” for ease of management and convenience in description when writing today’s tutorial. Note: please remove the .webp extension in the image link if you can’t save it on your computer

Or download link: https://drive.google.com/file/d/1V7dQ_c424r53bUJ5_jmeooKTuQ-rAmrM/view
Perform
To make it more convenient in the process of grasping the article, I will divide this tutorial to learn photoshop TUT into separate steps and give them names. Let’s start right away, open the downloaded image file and of course open photoshop online (can be opened in adobe photoshop PC)
Increase image size in photoshop
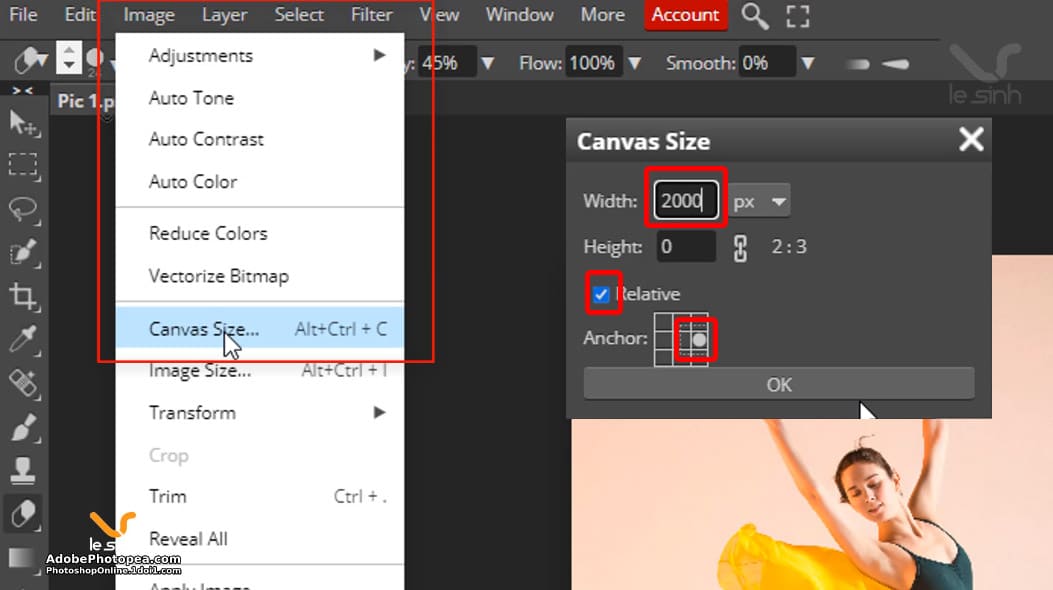
Step 1: Access the link on the photoshop menu bar: image > Canvas Size. Select the check mark in the Relative box. At Anchor, please select the position as shown in the picture. And the parameter Width = 2000 px. The reason I chose this parameter: Increase the size of the image to the left side, which will increase the size to 2000 px. Then click OK to execute.
Create background
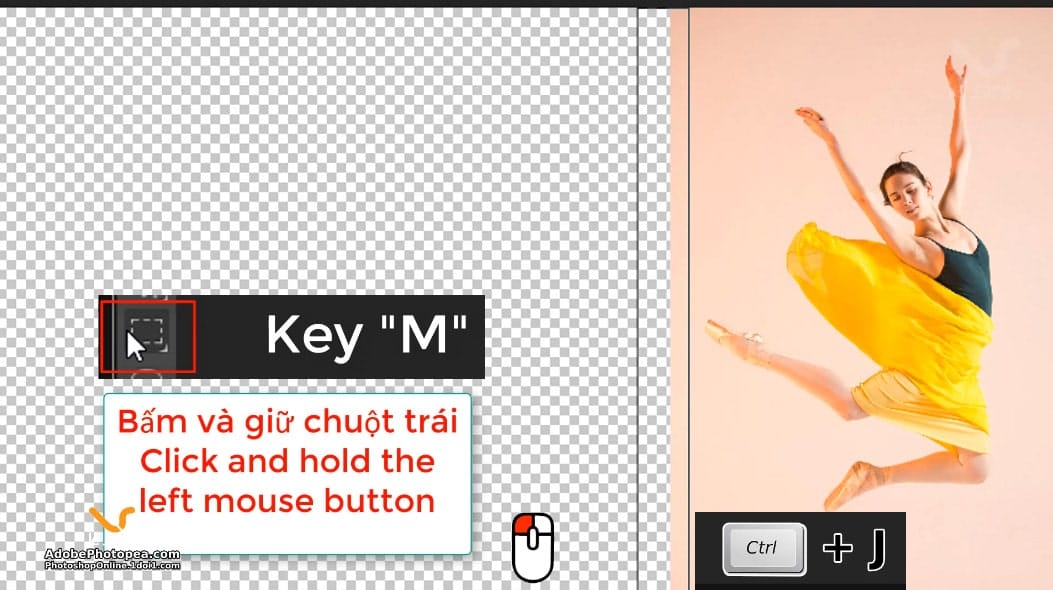
Step 2: Select the layer named “layer girl” (I named the layer with this girl image) – select rectangle select tool ( shortcut M ) – in photoshop adobe named “rectangular marquee tool” ( shortcut M ).
Click and hold left mouse button – sweep a selection at the outer edge of the “girl layer”. Once you have a selection, execute CTRL + J to duplicate the selection. Now we will have a new layer containing the pink background color, copied from the “girl layer”. Let’s call it layer BG.
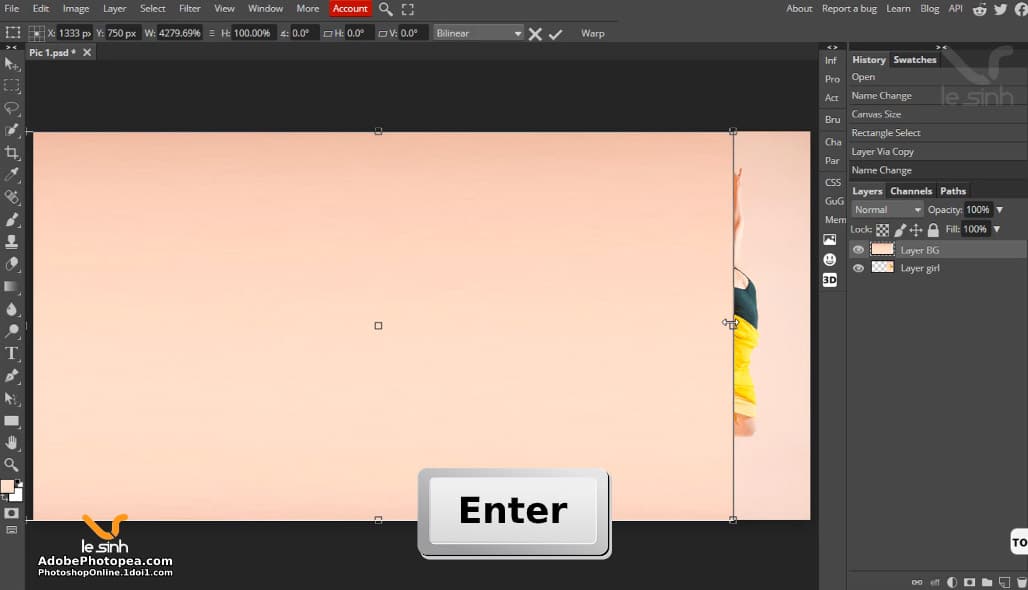
Continue, execute the command CTRL + T, a frame will appear around the image and small squares (or circles). Left click on a square at the edge of the image (as shown). Drag the left mouse to the left hand side, we will stretch this background sheet to create a BG that covers the entire part of the layer we are looking at (white and gray squares).
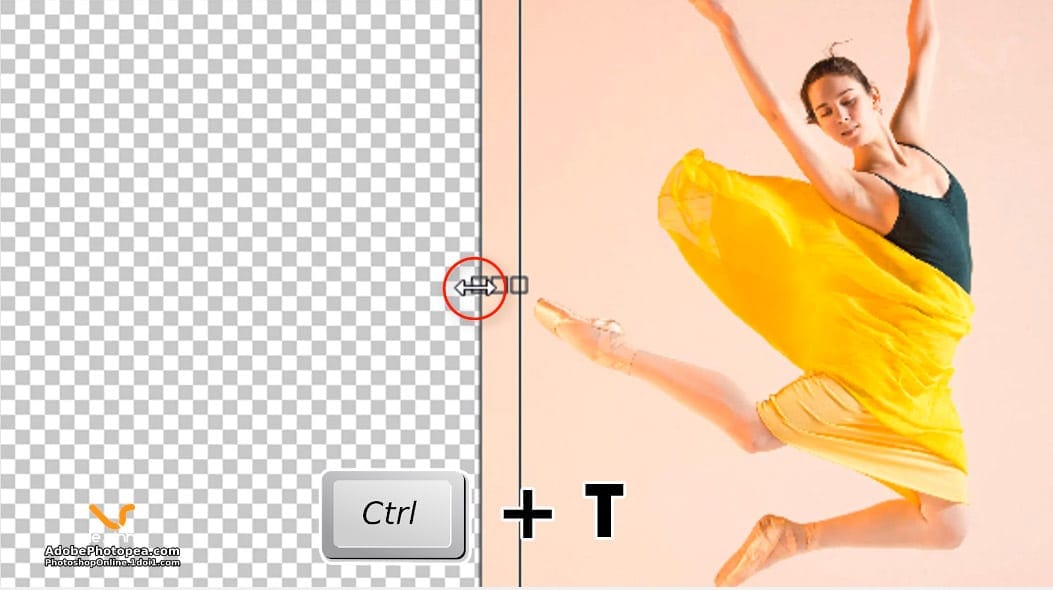
When finished it will look like this. Enter to end the command. This time we have a BG layer that covers almost the entire image of the “girl layer”.
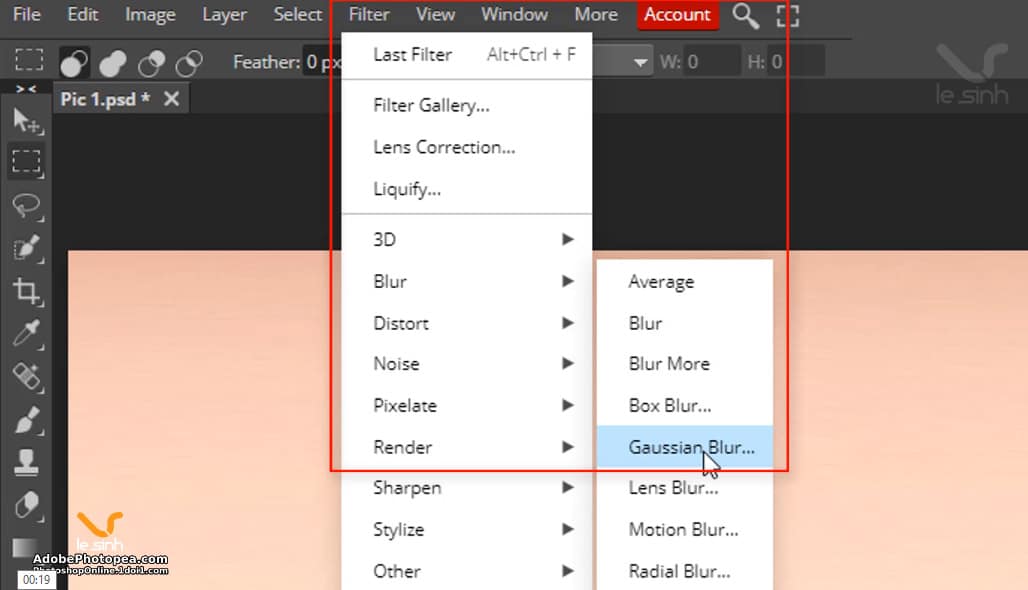
Step 3: When done with step 2, the BG layer image will not be smooth because we just stretched it. Smooth the image with the Filter > Blur > Gaussian Blur tool. Select the default parameters that your photoshop software (about 7) and press the OK key to finish the operation.
Split the object with the Pen tool ( P )
Step 4: Use the Pen Tool (shortcut P ) to separate the girl in the “girl layer”. Do the following: Press the P key > (with adobe photoshop you don’t need this step) choose Fill , Stroke and size 0.0pt as shown in the image below. Left click on the girl image > move the mouse to the next position > left click (repeat the action).
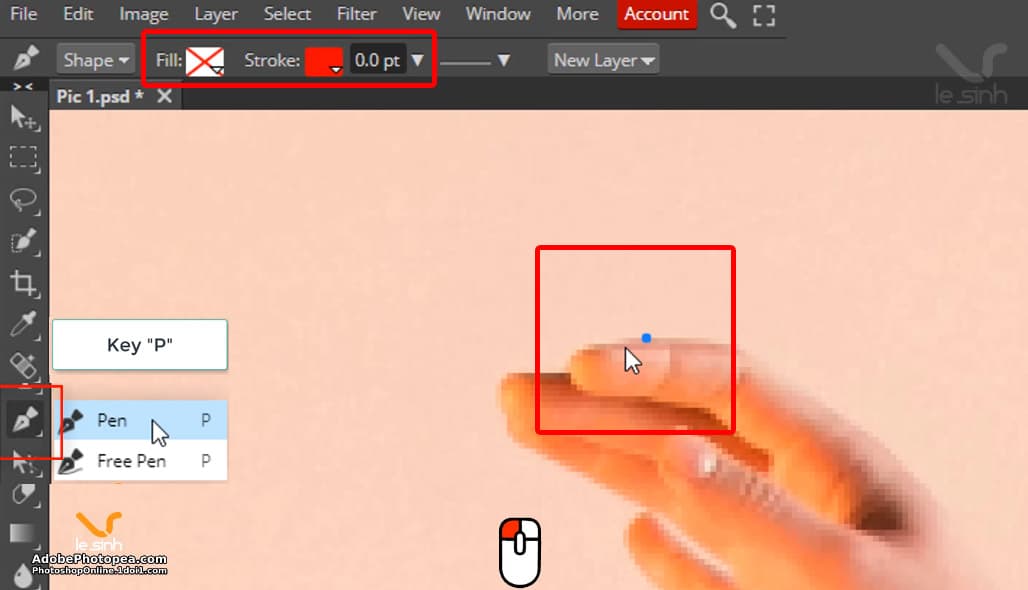
If this is your first time working with the Pen Tool in adobe photoshop. I will detail the usage.
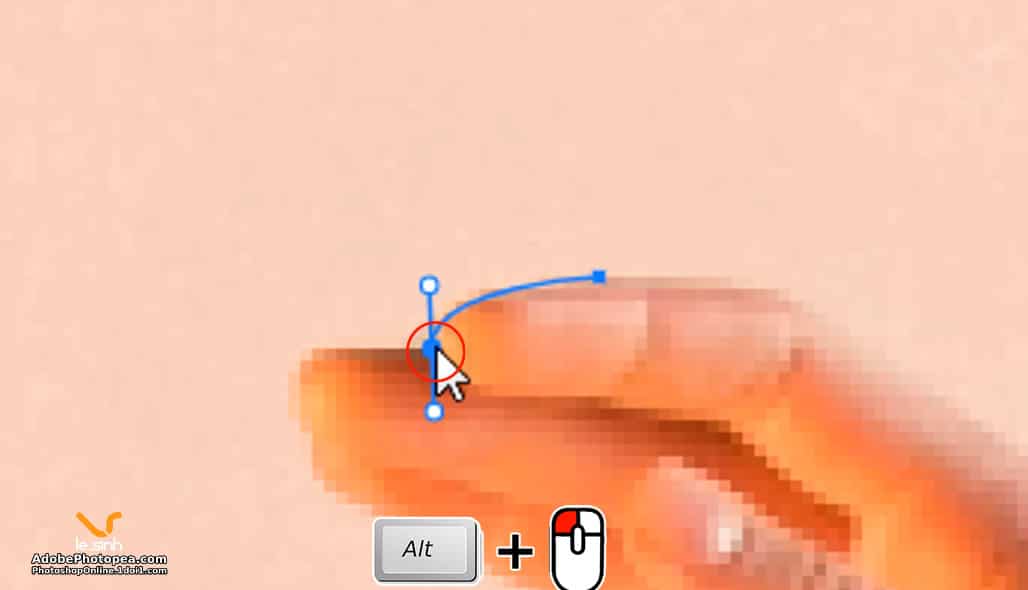
First: select the Pen tool > left click on a position on the image > move the mouse to the next position > click and hold the left mouse button! Hold down the left mouse button (do not release your hand) > move the mouse to any direction > now you will see the line is bent > release the left mouse button when the line bends as desired (closes the object you want to cut) ).
Now, if you continue to left click on the new location, the line will not be as expected (not hugging the object). Hold down the ATL key + Left click on the center dot (as shown in the picture I describe). The purpose of this is to cut off the curvature of the current line.
Okay, now you can repeat the same operation as before > left click on the next position > and so on until the Pen tool line covers the entire frame you want to cut.
Step 5: This step happens in 2 cases: With photoshop online ( photopea ) and adobe photoshop will be 02 different operations to finish the Pen Toolvaf command to separate the object after using the Pen Tool.
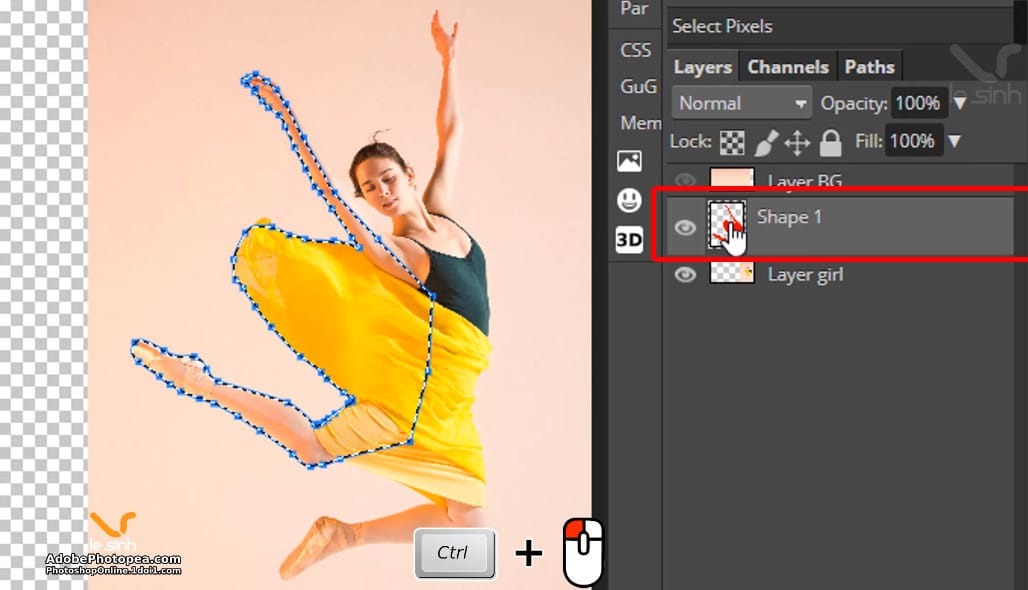
A. With Photoshop online (Photopea) : After using the Pen tool, draw a line that covers the girl. You will see a new layer is automatically created (in the picture is Shape 1). Now, to be able to duplicate the selection of the line from the Pen tool > At the Shape 1 layer > Press CTRL + left mouse button on the Shape 1 layer
A selection will be created > next release the CTRL key > left click “layer girl” > CTRL + J to duplicate the selection > go back to Shape 1 layer > press the Delete key until the Shape 1 layer disappears. Accomplished
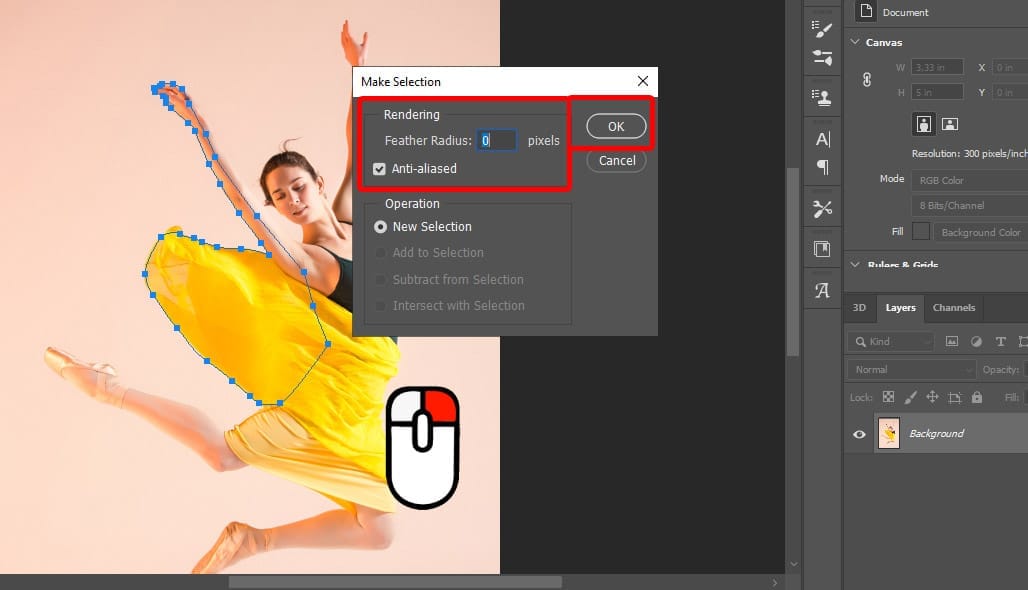
B. With Adobe Photoshop : After drawing the line with the Pen tool > right click on the image > menu appears > select Make Selection > At the Make Selection panel: Feather Radius parameter = 0 > Click OK to execute the command > Area selection will appear > CTRL + J to duplicate the selection > CTRL + D end the command.
Arrange and delete redundant layers
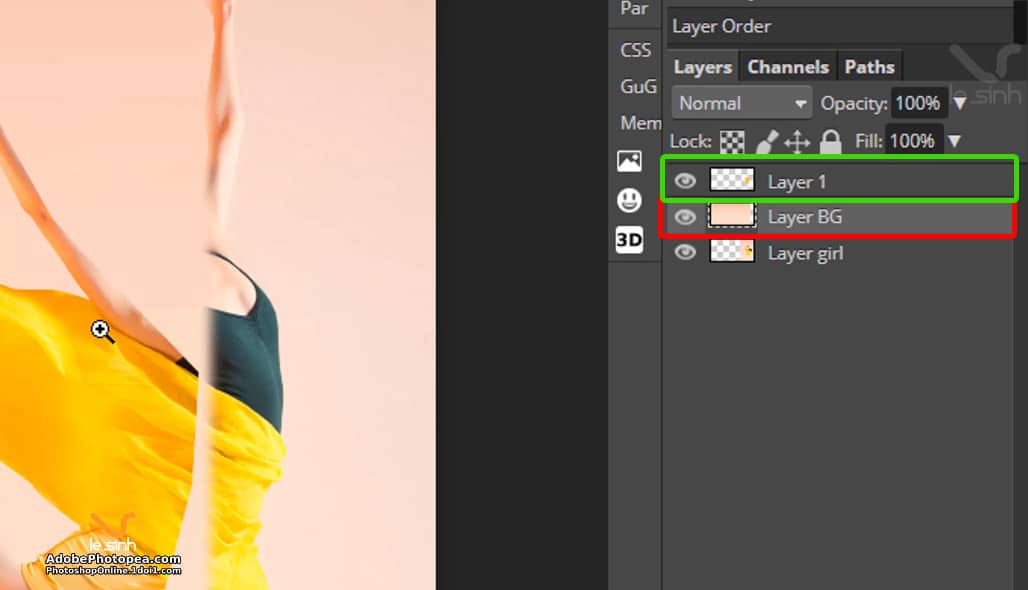
Step 6: Move the layer position as shown below: “layer BG” (with background image created in step 2), below “layer 1” (with part of the image cut out from the girl – we just perform ).
Step 7: Select “layer BG”, press the E key ( eraser tool ) and adjust the parameters as shown below (referencing – not required 100% same).
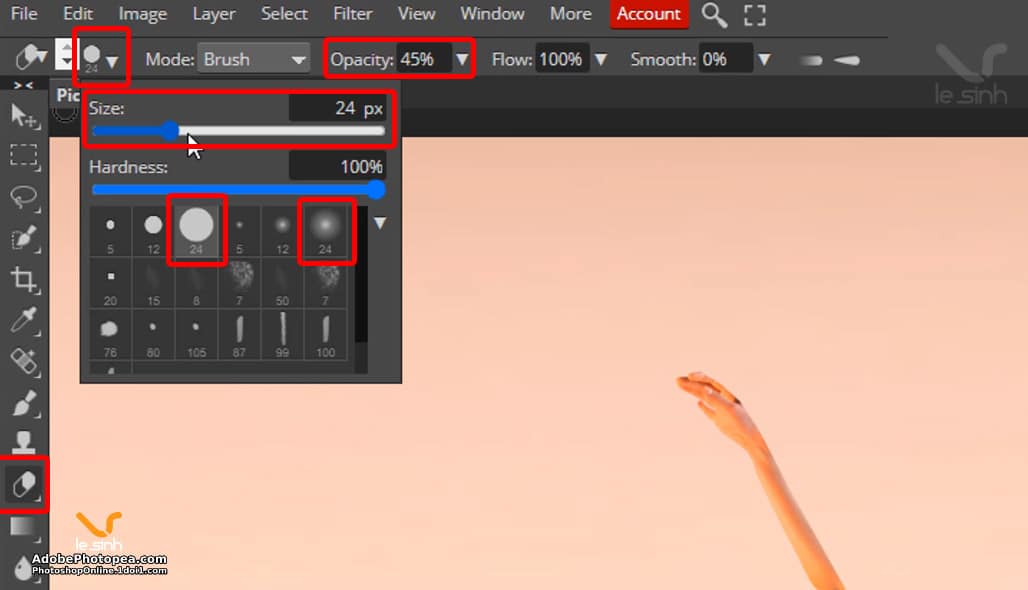
Delete the intersection between the 2 layers (do it on the BG layer). Until you achieve your desired perfection.
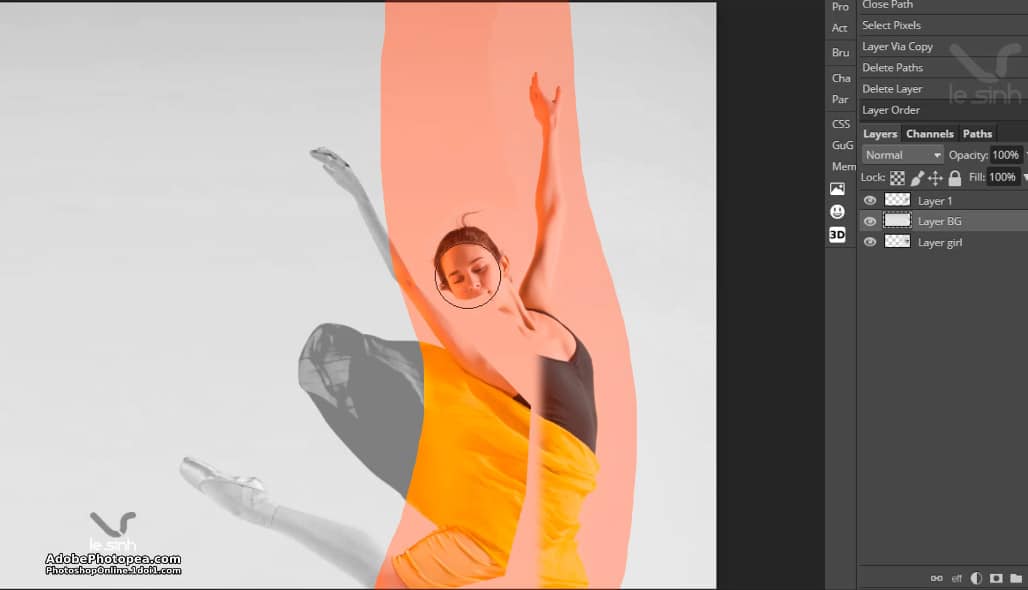
Create Silk in Photoshop with a girl’s skirt
Now is the time when we Create Silk in Photoshop as mentioned in this article, let’s proceed with it right away ^^.
Step 8: Select layer 1 (with a part of the image cut out from the girl layer) > Press the L key ( Lasso Select ) > use the left mouse button to scan a selection in the girl’s skirt to create a selection > CTRL + J clone selection > CTRL + D ends the command.
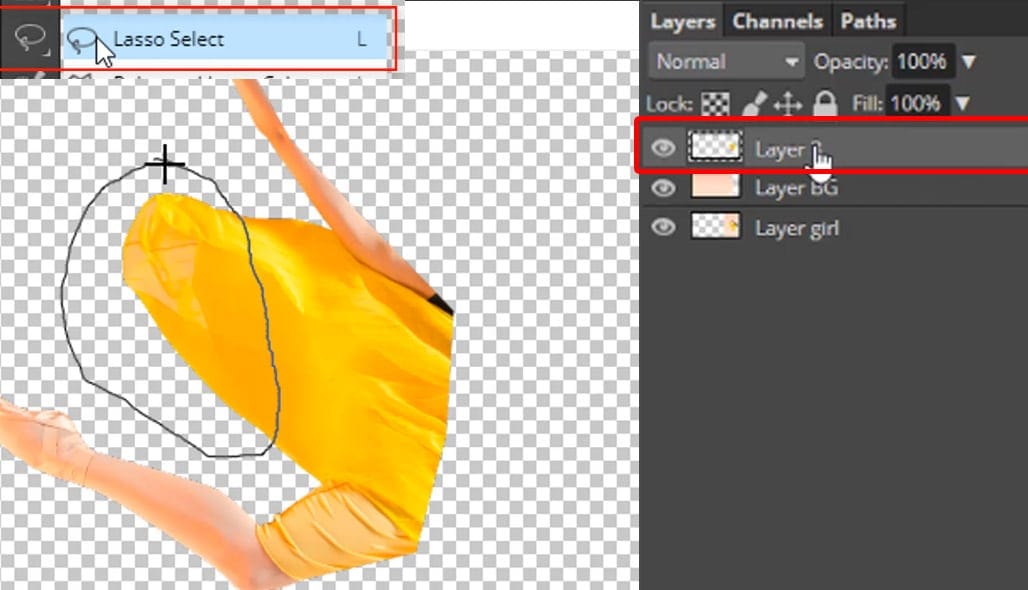
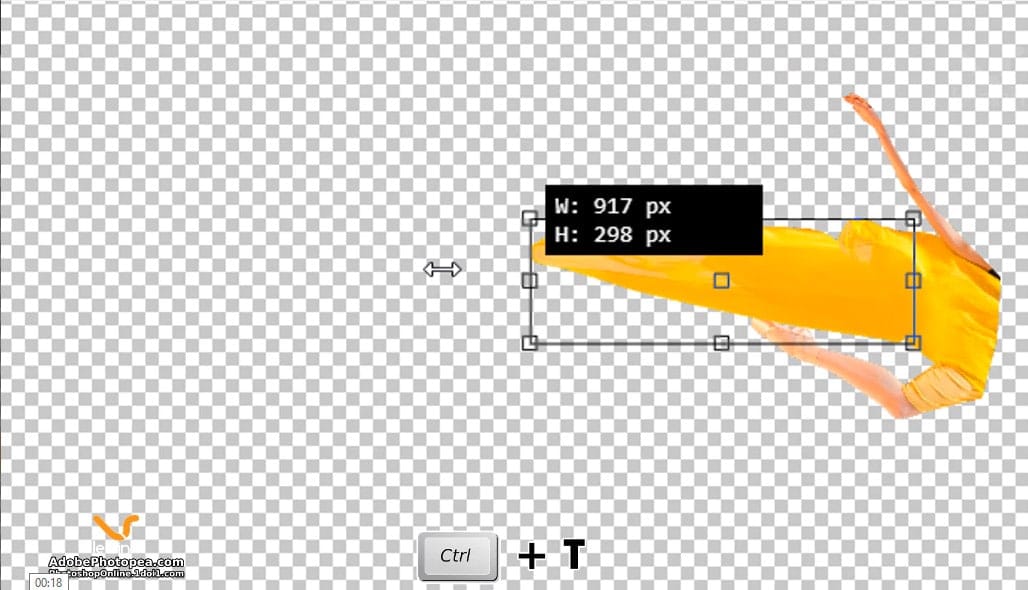
Step 9: press CTRL + T > click and hold left mouse button on a square point > drag the mouse to the left – drag to the end of the frame.
Step 10: Right-click > select Warp.
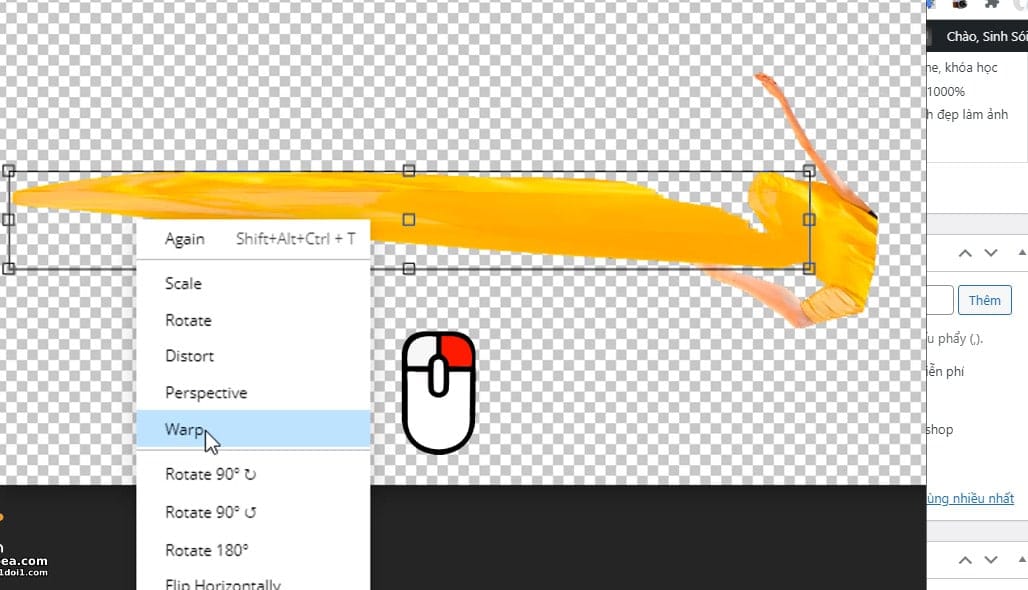
Step 11: Left click on the squares and drag the bottom square to the top > drag the upper square to the bottom. The middle squares (of these 2 squares) pull to the left. This is an important step in the tutorial Create Silk in Photoshop. Good or bad lies in this step, it depends on how you drag the squares.
Continue to adjust the other squares to make the silk more beautiful.
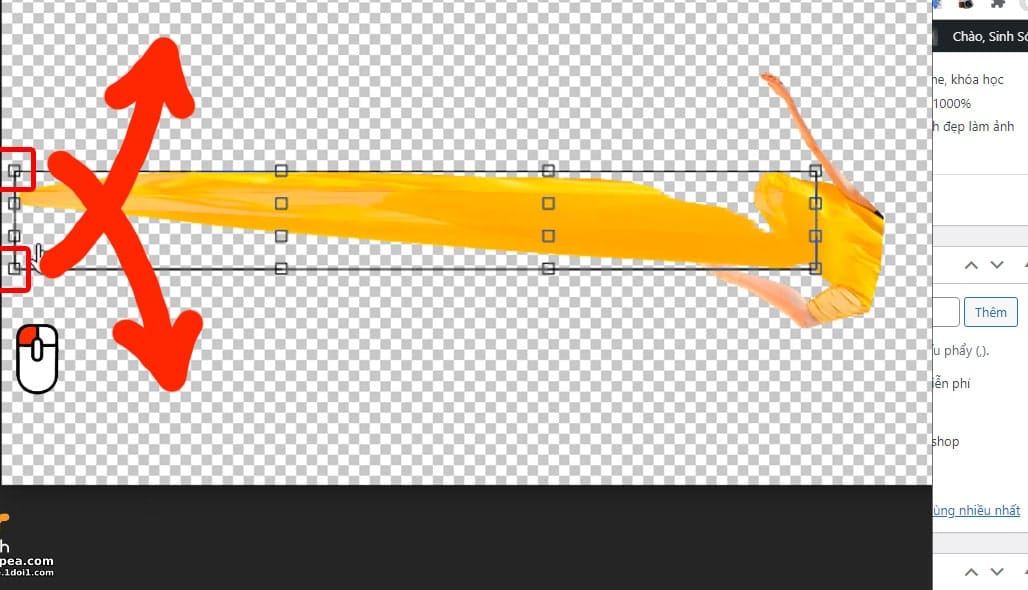
You can refer to the grids stretched by me in the tutorial Create Silk in Photoshop with the image below. Once you have the desired grid. Enter to end the command.
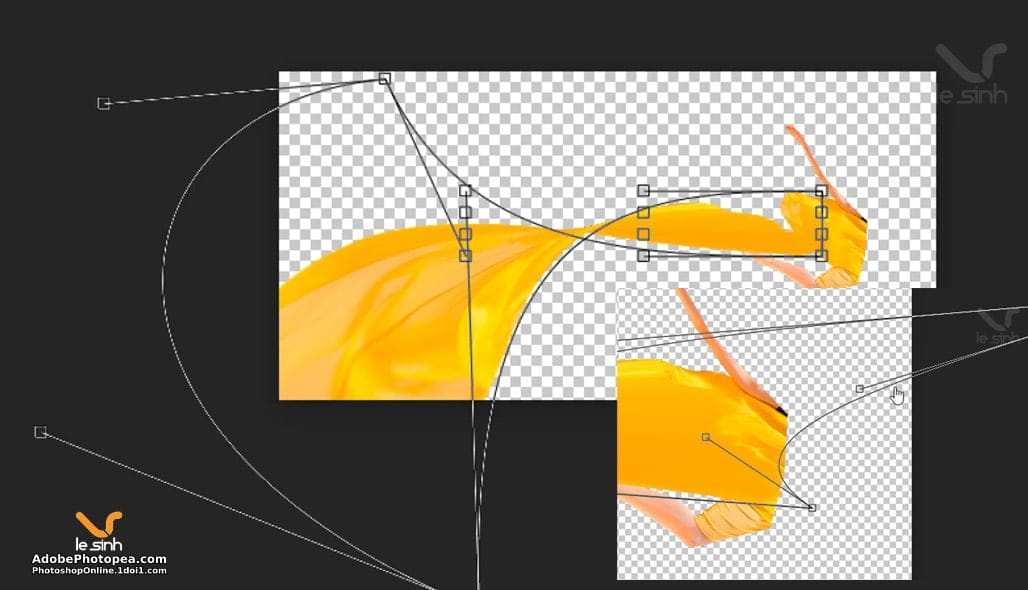
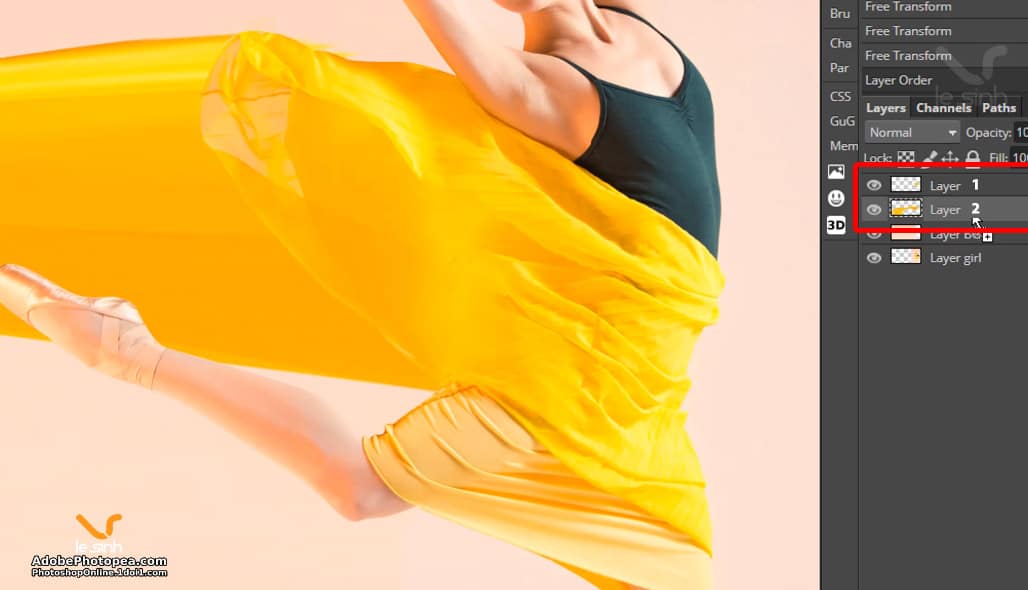
Step 12: Change the layer position. After completing step 11. Layer 2 (with stretched silk band) will be above layer 1 (with a part of the girl’s body cut out). That’s wrong, move layer 2 below layer 1 to do the next step.
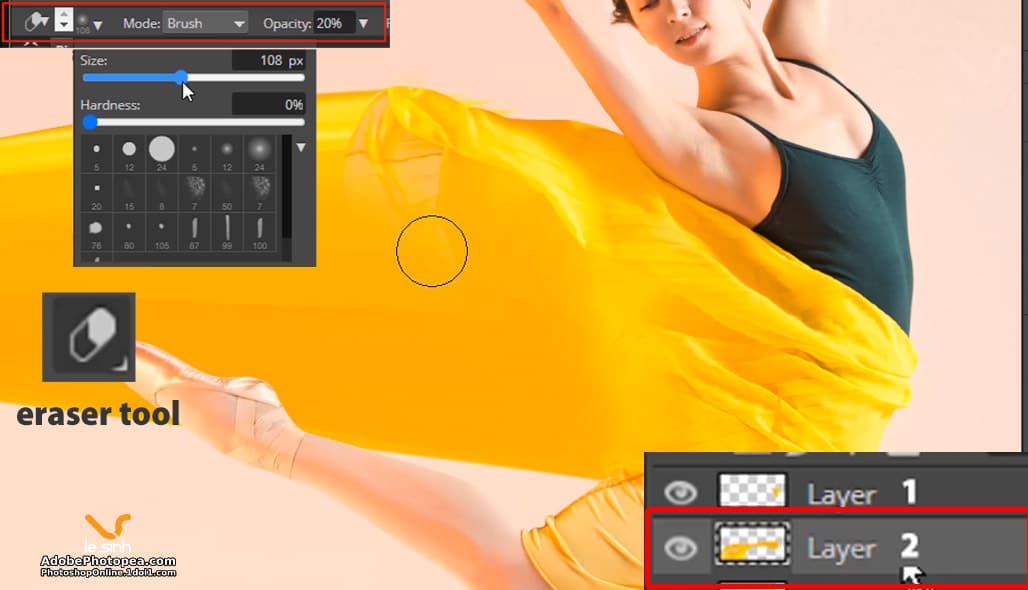
Step 13: After completing this step, you are done with Create Silk in Photoshop. Select layer 2 (with ribbon) > press E key (eraser tool) > select parameters as shown below > delete part of layer 2 image > until you get the image you want. That’s the end of the photoshop tutorial in today’s Tutorials photoshop free
Video on Create Silk in Photoshop
The article Create Silk in Photoshop confuses you because my language is not good? There is a youtube video edited by me right away. It may help you if you find it difficult to read this article. We look forward to receiving your support by clicking on ads on the website. Thanks very much.